
Most homeowners can safely handle crawl space cleanup themselves when the area involved is small, dry, and free of sewage or structural hazards. The EPA says mold patches under 10 square feet are typically a DIY job with the right gear. Anything larger, anything touching your HVAC system, or any water that might be contaminated calls for a professional. Either way, the job isn’t finished until you fix the moisture problem that caused it.
TL;DR:
- DIY cleanup is safe for mold patches under 10 square feet, but larger areas or contaminated water require professional intervention.
- Proper moisture control after cleaning involves sealing a 6-mil vapor barrier, fixing outside water sources, and maintaining indoor humidity between 30 and 50 percent.
- Costs vary widely, from nothing for small DIY jobs to thousands for full encapsulation and structural repairs, with insurance typically excluding long-term mold damage.
- Limited containment and PPE are sufficient for areas under 10 square feet; larger infestations demand full containment with negative air pressure.
- Addressing water intrusion and moisture sources is crucial to prevent mold recurrence, making moisture control the foundation of effective long-term remediation.
Table of Contents
- Step-by-step crawl space cleanup process
- Safety gear and containment levels for different job sizes
- Mold thresholds and when a professional takes over
- Stopping moisture for good after the cleanup
- What crawl space cleanup and remediation actually cost
- Quick checklist for the first 48 hours
- When we tell homeowners to DIY and when we don’t
- How some companies handle crawl space problems you can’t DIY
- FAQ
- Sources
Step-by-step crawl space cleanup process
Before you touch anything, get into the crawl space with a flashlight and check for standing water, sagging joists, exposed wiring, or signs of pests. Photograph any damage for your records, then figure out your clearance and whether you need knee pads, a headlamp, or a mechanic’s creeper to move around comfortably.
Once you know what you’re dealing with, work through the cleanup in order:
- Clear loose debris, old insulation batts, cardboard, and anything else that doesn’t belong.
- Remove and double-bag porous materials that are wet or moldy, since insulation, wood scraps, and cardboard rarely clean up well enough to save.
- Vacuum hard surfaces (joists, piers, subfloor) with a HEPA-filter vacuum before you introduce any liquid.
- Scrub remaining mold on hard surfaces with detergent and water, following EPA cleanup guidance rather than improvising with harsh chemicals.
- Set up fans and a dehumidifier to dry the space, aiming to get everything dry within 24 to 48 hours as the EPA recommends.
A few things make this go faster and safer:
- Work in sections so you’re never standing in an unlit or unstable area for long.
- Keep a trash chute or wheelbarrow near the access point so you’re not hauling bagged debris by hand across the yard.
- Check your dehumidifier’s water tank or drain line daily until the space tests dry.
Don’t mix cleaning chemicals, especially bleach and ammonia, since the combination produces dangerous fumes.
Safety gear and containment levels for different job sizes
At minimum, wear an N95 respirator, goggles, and gloves anytime you’re cleaning mold, a baseline the CDC also recommends for homeowners handling post-disaster cleanup. For larger or more stubborn jobs, step up to a half-face respirator with P100 cartridges or a powered air-purifying respirator.
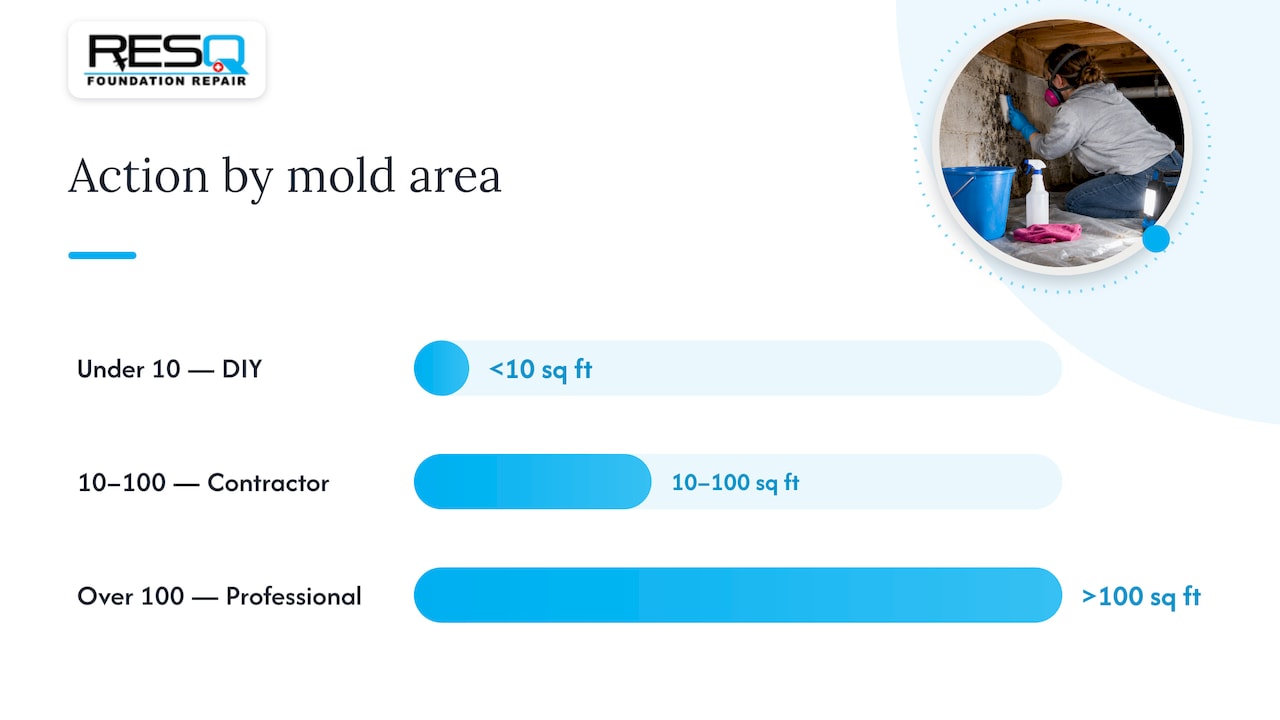
- Under 10 square feet: homeowner-level PPE is enough, per EPA guidance.
- 10 to 100 square feet: EPA remediation guidance calls for limited containment, which is a job better suited to a professional crew.
- Over 100 square feet, or any sign the HVAC system is involved: full containment and professional remediation are warranted.
Pro Tip: Seal your HEPA vacuum’s filter in a plastic bag the moment you remove it, rather than carrying it through the house to the trash can.
Mold thresholds and when a professional takes over
The EPA’s 10-square-foot rule of thumb is the clearest line homeowners have for deciding whether to DIY. Below that, soap, water, and patience usually do the job. Above it, the math changes fast.
- Under 10 square feet: clean it yourself with detergent, water, and the PPE above.
- 10 to 100 square feet: limited containment using sealed plastic sheeting is the recommended approach, typically handled by a remediation contractor.
- Over 100 square feet, or contamination reaching the HVAC system: full containment with negative air pressure is standard practice.
EPA remediation guidance describes professional containment using double-layer, 6-mil polyethylene sheeting with negative-pressure airflow and HEPA filtration, plus decontamination airlocks so spores don’t travel into living spaces during the work.
A few situations should send you straight to the phone instead of the hardware store: anyone in the household who is immune-compromised, visible mold or residue inside HVAC ductwork, or any water that might carry sewage. FEMA warns against running fans until you know the water is clean, since circulating contaminated air can spread the problem instead of drying it out. If you suspect your HVAC system is affected, resources on HVAC mold prevention explain why running the system before inspection can push spores through every vent in the house.
Stopping moisture for good after the cleanup
Cleaning the mold without fixing the moisture source just buys you a repeat visit in a year. The permanent fix starts with a proper vapor retarder.
- Use sheeting at least 6 mil thick, lapping seams 6 to 12 inches and extending the material at least 6 inches up walls and piers, per Department of Energy installation guidance.
- Mechanically fasten the liner and seal every penetration where pipes or posts pass through, since gaps left at these points are one of the most common DIY mistakes.
- Address the water source outside: regrade soil away from the foundation, clean out gutters, and add perimeter drainage or a sump pump if water is pooling near the crawl space walls. Foundation RESQ’s crawl space waterproofing page covers these fixes in more detail.
- Add a dehumidifier sized for the space and keep relative humidity between 30 and 50%, never above 60%, which lines up with EPA water-control guidance. Our crawl space dehumidification guide walks through sizing.
Be careful with insulation placement. A vapor-impermeable barrier installed on the wrong side of air-permeable insulation in a below-grade space can trap moisture against the wood and cause hidden rot, so match your approach to your climate rather than guessing.
What crawl space cleanup and remediation actually cost
Costs scale fast with square footage, contamination type, and whether the HVAC system is involved. A small DIY cleanup might cost you nothing but a few supplies, while mold remediation and full encapsulation involve labor, equipment, and materials that add up quickly.
- Containment materials, HEPA filtration, and sealed disposal of contaminated debris are common line items on a remediation quote.
- Dehumidifier rental or permanent installation often gets billed separately from the remediation work itself.
- Structural repairs, if water damage has reached joists or subflooring, can be the largest single cost driver.
Standard homeowners insurance generally excludes mold damage caused by long-term moisture or poor maintenance, according to the Insurance Information Institute, so budget for remediation as an out-of-pocket cost unless a specific covered peril, like a sudden pipe burst, caused it.
When comparing quotes, ask what’s actually included: containment setup, HEPA filtration, drying equipment, and whether there’s a warranty on the work. A lower bid that skips containment or proper drying time often costs more later.
Quick checklist for the first 48 hours
If you’ve just found water or mold, act fast but carefully:
- Stop the water source and document the damage with photos.
- Remove small, dry debris and start air movement if the water is confirmed clean.
- Don’t paint over mold, run the HVAC system if contamination is possible, or mix cleaning chemicals.
- Call a professional if the area exceeds 10 square feet or the water may be contaminated.
When we tell homeowners to DIY and when we don’t
Moisture control is the fix that actually lasts. Cleaning mold without addressing the water source is a short-term patch, not a solution.
A damp corner after a light rain is a reasonable weekend project. Standing water, a sagging floor joist, or ductwork that smells musty is a different category entirely, one where Some professional crawl space remediation and encapsulation services handle drainage, vapor barrier, and dehumidification work together instead of piecemeal.
— Kayle
How some companies handle crawl space problems you can’t DIY

When a crawl space problem goes past detergent and a shop vac, fixes can be built around specific moisture sources and soil conditions instead of one-size-fits-all solutions. Some companies handle a full range of crawl space issues:
- Crawl space remediation and mold removal for contamination beyond the DIY threshold.
- Encapsulation systems using sealed vapor barriers designed to stop ground moisture for good.
- Dehumidification sized to your space and humidity targets.
- Waterproofing fixes, including drainage and sump solutions, for water intrusion at the source.
A free inspection may cover the crawl space, moisture source, and any structural concerns found, with financing options possibly available for repairs beyond a one-time cleanup. If your crawl space needs more than a weekend of elbow grease, see our crawl space services and get a free inspection scheduled.
FAQ
How much does it cost to have your crawl space cleaned?
Costs depend on square footage, contamination type, and whether structural repairs are needed, so there’s no single published figure that applies to every job. Foundation RESQ’s crawl space repair pricing is available through a free inspection rather than a flat rate, since every crawl space differs.
What is the best way to clean a crawl space?
Remove debris and unsalvageable porous materials first, then HEPA vacuum hard surfaces before scrubbing them with detergent and water, following EPA cleanup guidance. Dry the space completely within 24 to 48 hours and address the moisture source so the problem doesn’t return.
Will homeowners insurance cover crawl space encapsulation?
Standard homeowners policies generally exclude mold and moisture damage tied to long-term conditions or poor maintenance, according to the Insurance Information Institute. Coverage usually depends on whether a specific covered peril, like a burst pipe, caused the damage rather than ongoing ground moisture.
How much does it cost to encapsulate a 2,000 square foot crawl space?
Encapsulation pricing varies by region, materials, and the extent of drainage or dehumidification work needed, and no single rate applies universally. Foundation RESQ provides project-specific quotes after a free inspection rather than a general estimate.
Sources
- Mold cleanup in your home | US EPA
- Mold Remediation in Schools and Commercial Buildings | US EPA
- Homeowners and renters guide to mold cleanup after disasters | CDC
- Which disasters are covered by homeowners insurance? | Insurance Information Institute (III)
- Install or repair a crawl-space vapor retarder | U.S. Department of Energy