
Before you sign anything, run through this checklist. These five steps are the minimum defensible process for any prospective tenant or lessee who wants to evaluate property risk without getting burned by a problem the landlord knew about and you didn’t.
- Do a personal walkthrough first. You’re looking for obvious red flags: cracks in walls or floors, staining on ceilings, doors that won’t close squarely, musty odors. Photograph everything with timestamps. This is free and takes an hour, but it tells you whether to invest in a professional inspection or walk away immediately.
- Request documents from the landlord. Ask for maintenance and repair records, prior inspection reports, permits for any structural work, and any existing Property Condition Reports (PCRs). A landlord who can’t or won’t produce these is telling you something.
- Schedule a licensed professional inspection. For residential properties, hire an ASHI- or InterNACHI-certified home inspector. For commercial properties, commission a Property Condition Assessment (PCA) conducted under ASTM E2018, the industry baseline standard. Book at least two to three weeks ahead.
- Require a written opinion of probable cost (OPC). Any inspection report worth relying on in a negotiation needs dollar figures attached to identified deficiencies, not just descriptions. No OPC, no negotiating power.
- Add a structural contingency to the lease. Before signing, insist on a clause that lets you terminate or renegotiate if inspection findings exceed a defined threshold. Get this in writing before the inspection happens, not after.
Document every communication with the landlord in writing. Emails, not phone calls. Signed checklists, not handshakes. That paper trail is your evidence file if a dispute arises after move-in.
Key Takeaways
Assessing structural risk before leasing requires a documented, professional process: a PCA under ASTM E2018 produces the OPC-backed PCR that converts inspection findings into enforceable lease protections.
| Point | Details |
|---|---|
| Use ASTM E2018 as your standard | A PCA/PCR under this standard includes OPCs that make findings usable in lease negotiations. |
| Time the inspection to your contingency | Schedule the PCA during the due-diligence window so findings can be negotiated before you’re committed. |
| Document everything in writing | Photographs with timestamps, signed checklists, and email records are your evidence if a dispute arises. |
| Match the professional to the risk | Use a certified home inspector for residential leases; commission a PE or ASTM E2018 PCA for commercial properties with structural exposure. |
| Foundationresq provides repair scopes | For foundation, waterproofing, crawl space, or mold findings, Foundationresq delivers free inspections and OPC-backed repair proposals in North Florida, South Georgia, and Alabama. |
Table of Contents
- What is a property condition assessment, and why does ASTM E2018 matter?
- When should you schedule a structural assessment in the lease timeline?
- What physical areas should you inspect for structural risk?
- Which professionals should you hire, and what does each one deliver?
- A compact tenant walkthrough checklist for your site visit
- What red flags should stop you from signing?
- What do inspections and remediation typically cost?
- How do you negotiate repair responsibilities and protective lease language?
- What remediation options exist, and how does a repair provider evaluate the work?
- What should you do after you receive the inspection findings?
- What tenants consistently get wrong about structural inspections
- Foundationresq turns inspection findings into completed repairs
- Sources
- FAQ
What is a property condition assessment, and why does ASTM E2018 matter?
A Property Condition Assessment (PCA) is a structured evaluation of a building’s physical condition conducted by a qualified professional, typically a licensed engineer or experienced inspector. The output is a Property Condition Report (PCR), a formal document that describes observed deficiencies, reviews available records, and attaches cost estimates to identified problems.
The standard that governs this process in the United States is ASTM E2018, published by ASTM International. It defines the baseline PCA as a combination of a physical walk-through survey and document research, resulting in a PCR that includes opinions of probable costs (OPCs) for remedying identified physical deficiencies. That last part matters enormously in a lease context: without cost estimates, inspection findings are just descriptions. With OPCs, they become the basis for a dollar-backed negotiation.
A PCR prepared under ASTM E2018 typically contains:
- Walk-through observations with photographs and descriptions of observed conditions
- Document review summary covering available maintenance records, permits, prior reports, and interviews with property management
- Opinions of probable cost for each identified deficiency, organized by immediate, short-term, and long-term repair categories
- Scope limitations and exclusions that specify what was not inspected and why
- Remaining useful life estimates for major systems such as roofing and HVAC
That last bullet is one most tenants overlook. Scope limitations tell you what the inspector didn’t see, which is just as important as what they did.
A PCA conducted under ASTM E2018 reduces uncertainty about a building’s physical condition, but it does not eliminate it. The standard explicitly recommends tailoring the PCA scope to the user’s objectives and risk tolerance, and it acknowledges that some deficiencies can only be confirmed through invasive investigation or specialized testing beyond the baseline walk-through.
If a PCR flags something it couldn’t fully evaluate, that’s your signal to commission additional testing before signing, not after.
When should you schedule a structural assessment in the lease timeline?
Timing determines whether your inspection findings give you leverage or just regret. Schedule too late and you’ve already committed; schedule too early without a contingency and you’ve paid for information you can’t act on.
For commercial leases, the standard practice is to conduct the PCA during the due-diligence or option period, which typically runs 30 to 60 days in commercial transactions. This window exists precisely for this purpose. A pre-lease commercial inspection gives prospective lessees documented leverage to negotiate repairs, rent reductions, or tenant improvement allowances before the lease is executed. If the landlord won’t grant a due-diligence period, that’s a red flag in itself.
For residential leases, the timeline is compressed. Most residential leases don’t include a formal due-diligence period, which means you need to act before signing, not after. Some states provide statutory protections. Minnesota Statute 504B.182, for example, requires landlords to offer tenants an initial inspection option within 14 days of occupancy to document existing deficiencies. Check your state’s landlord-tenant statutes because the protections vary significantly.
Here’s a practical scheduling sequence that works for both residential and commercial situations:
- Before submitting an application or letter of intent: Do your personal walkthrough and photograph obvious concerns. Decide whether the property warrants professional inspection.
- Immediately after an offer or LOI is accepted: Request all available property documents from the landlord. Simultaneously contact inspectors or PCA firms to check availability. Quality professionals book out two to three weeks.
- During the contingency or due-diligence period: Conduct the licensed inspection or PCA. For commercial properties with significant structural concerns, bring in a licensed structural engineer (PE) for a targeted evaluation.
- Before the contingency expires: Review the PCR, get OPC-backed estimates for any flagged issues, and present findings to the landlord with specific repair or credit requests.
- Final walk-through before lease commencement: Confirm that any agreed-upon repairs were completed. Document the post-repair condition with photographs dated the day you take possession.
Missing step 5 is one of the most common and costly tenant mistakes. Verbal confirmation that repairs are done is not the same as a signed completion certificate and dated photographs.
What physical areas should you inspect for structural risk?
A thorough pre-lease inspection checklist covers every building system that affects safety, occupancy, and long-term cost. Here’s what to prioritize and why each area matters to you as a lessee.
Foundation and structural framing
The foundation is the starting point for each other structural concern. Look for cracks in the slab or perimeter walls, uneven floors, and doors or windows that stick or won’t close properly. Diagonal cracks running from corners of door and window frames often indicate differential settlement. Bowed or bulging basement or crawl-space walls suggest lateral soil pressure that’s actively moving. These are not cosmetic issues.
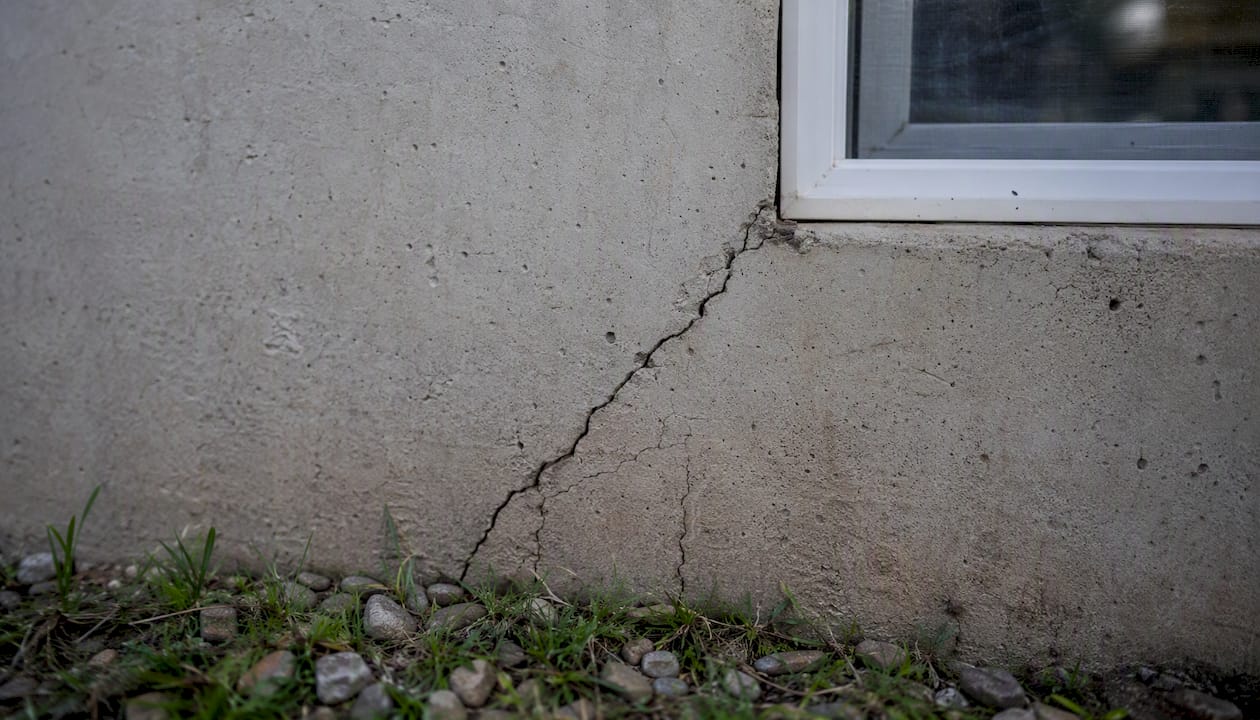
Load-bearing walls and structural framing deserve the same scrutiny. Sagging floor joists, notched or cut structural members, and visible deflection in beams are signs that someone modified the structure without engineering oversight, or that deferred maintenance has reached a critical point.
Roof and drainage
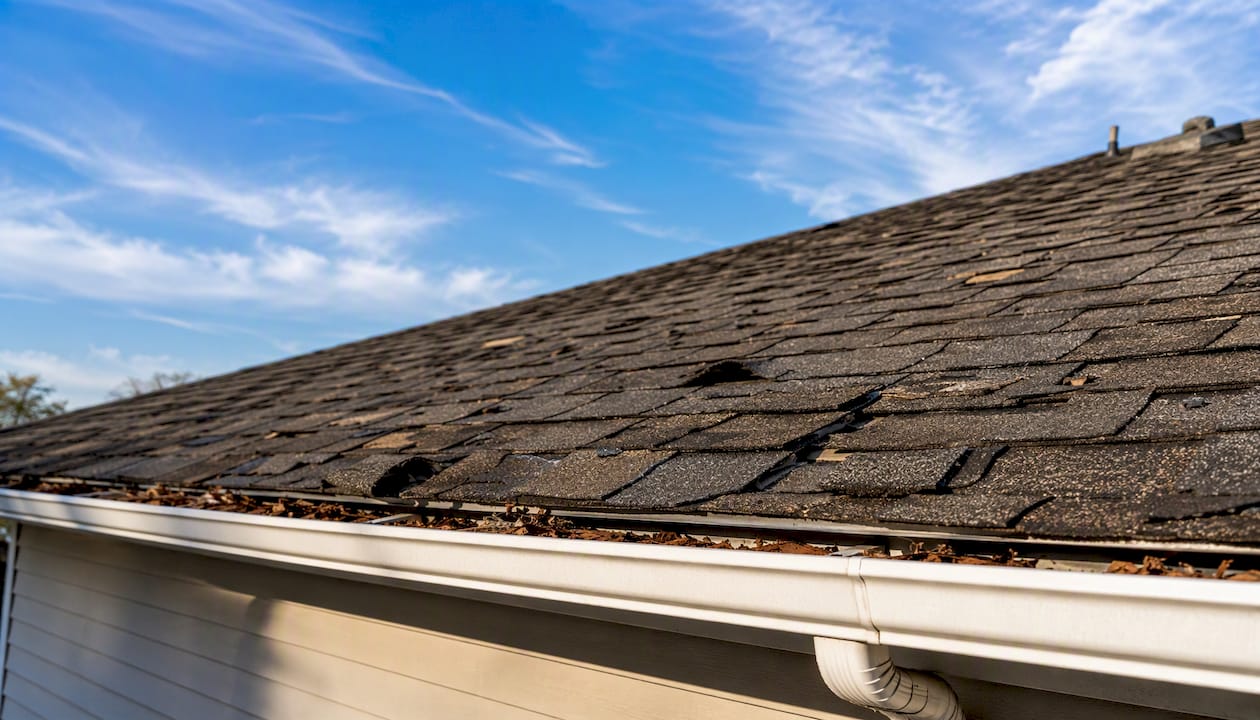
A failing roof is one of the most expensive surprises a tenant can inherit. Check for missing, curling, or granule-stripped shingles. Look at the gutters and downspouts: are they intact, properly sloped, and discharging water away from the foundation? Flat commercial roofs need inspection for ponding water, membrane separation, and failed flashing around penetrations.
Water intrusion, crawl spaces, and basements
Water is the single most destructive force in a building over time, and it’s often invisible until it’s already caused structural damage. Look for staining on walls and ceilings, efflorescence (white mineral deposits) on concrete or masonry, and soft or discolored flooring. In crawl spaces, check for standing water, deteriorated vapor barriers, wood rot, and mold on joists and subfloor. Crawl space waterproofing and encapsulation are common remediation needs that carry real costs and should be reflected in any OPC.
Site drainage matters too. If the grade slopes toward the building rather than away from it, water is being directed into the foundation every time it rains.
Exterior envelope, HVAC, electrical, and life safety
- Exterior envelope: Check siding, cladding, window seals, and caulking for gaps, cracks, or deterioration that allow water infiltration.
- HVAC: Note the age and condition of units. Ask for service records. An aging system with no maintenance history is a capital expense waiting to happen.
- Electrical: Look for the panel age and type. Federal Pacific and Zinsco panels, for example, have documented safety concerns and are frequently flagged in inspections. Check for visible exposed wiring or double-tapped breakers.
- Plumbing: Look under sinks for staining or active moisture. Ask about pipe material and age, especially in older buildings where galvanized or polybutylene pipe may still be present.
- Fire and life safety: Confirm that sprinkler systems, fire extinguishers, exit signage, and smoke/CO detectors are present and current. In commercial properties, ADA compliance is also worth documenting.
Pro Tip: When photographing structural concerns, always include a reference object for scale (a coin, a tape measure, your hand), shoot from two distances (close-up and context), and make sure your phone’s location and timestamp metadata are enabled. Those details convert photographs from “interesting pictures” into dated evidence.
Which professionals should you hire, and what does each one deliver?
Not every inspection need requires the same professional. Hiring the wrong one wastes money and leaves gaps in your risk picture.
The four tiers of inspection
Tenant walkthrough (you): Free, immediate, and useful for obvious red flags only. No report, no credentials, no defensibility in a negotiation. Use it to decide whether to invest in professional help.
Licensed home inspector (ASHI or InterNACHI certified): Appropriate for residential properties and smaller commercial buildings. A certified inspector examines visible, accessible systems and produces a written report with photographs. What a standard home inspection typically does not include: document review, formal OPCs, remaining useful life estimates, or the structured scope framework that ASTM E2018 requires. For a residential lease, this level is usually sufficient. For a commercial lease with significant capital exposure, it’s not enough on its own.
Licensed structural engineer (PE): Bring in a PE when the home inspector or PCA flags a specific structural concern that needs engineering judgment. A PE can assess load-bearing capacity, evaluate crack patterns against settlement models, specify repair methods, and sign off on structural adequacy. Their report carries legal weight that a general inspection report does not. Expect a targeted structural evaluation to take one to two weeks to schedule and produce.
PCA consultant under ASTM E2018: The appropriate standard for commercial leases and any residential transaction with significant structural exposure. The PCA combines a physical walk-through with document research and produces a PCR that includes OPCs. This is the format that makes findings usable in lease negotiations because it attaches dollar figures to deficiencies rather than leaving cost as a matter of opinion.
How to vet the professional you hire
Before engaging any inspector, engineer, or PCA firm, ask:
- What license or certification do you hold, and in which state? (Verify independently.)
- Have you conducted inspections on properties of this type and size?
- Will your report include opinions of probable cost?
- Can you provide a sample report or work product?
- What is explicitly excluded from your scope, and how will you communicate that?
The answer to the last question is particularly telling. A professional who can’t clearly articulate what they won’t be inspecting is one who may not have read ASTM E2018’s guidance on scope limitations.
A compact tenant walkthrough checklist for your site visit
Use this checklist during your personal visit before committing to a professional inspection. It won’t replace a licensed inspector, but it will tell you what questions to ask and what to photograph.
Exterior and site
- Grade slopes away from the building on all sides
- No visible foundation cracks wider than a hairline
- Gutters and downspouts intact and discharging away from the structure
- No staining, efflorescence, or spalling on exterior masonry
- Siding or cladding intact with no gaps, rot, or open seams
- Windows and doors open and close without binding
Foundation and structural
- No diagonal cracks at door or window corners
- No bowed or bulging walls in basement or crawl space
- Floors feel solid underfoot with no soft spots or noticeable slope
- No visible sagging in ceilings or floor systems above
Interior and mechanicals
- No water staining on ceilings, walls, or around windows
- No musty or mildew odor in any room, closet, or mechanical space
- HVAC units present and service tags visible
- Electrical panel accessible and labeled; no visible exposed wiring
- No active drips or staining under sinks or around fixtures
Safety systems
- Smoke detectors present in required locations
- Fire extinguishers present and tagged (commercial)
- Exit signage lit and visible (commercial)
- No blocked or compromised egress paths
Pro Tip: Walk the perimeter of the building slowly and photograph every crack, stain, or gap you find. Then walk the interior and do the same. At the end, compile your photos into a single folder labeled with the property address and the date. If you later need to document that a condition existed before your tenancy began, that folder is your evidence.
After your walkthrough, compile your photographs and written notes into a single document. Send it to the landlord by email with a note that you observed these conditions and are requesting clarification before proceeding. That email creates a timestamped record that the landlord was notified of the conditions you saw.
What red flags should stop you from signing?
Not every deficiency is a deal-stopper. The question is how to sort the cosmetic from the serious, and the serious from the dangerous.
Informational level: note and monitor
- Hairline cracks in drywall or plaster (common with normal settling)
- Minor caulking gaps around windows or doors
- Surface rust on HVAC equipment with otherwise functional operation
- Isolated, minor staining on ceilings with no active source
These conditions warrant documentation and a request for landlord disclosure, but they don’t threaten the structure or your safety.
Moderate concern: require written repair commitments before signing
- Cracks wider than 1/4 inch in foundation walls or slabs
- Evidence of prior water intrusion with no documented remediation
- HVAC systems beyond their expected service life with no replacement plan
- Roof at or past its rated lifespan with no recent inspection
- Localized wood rot in framing or subfloor
- Mold in isolated areas with an identifiable and correctable moisture source
For these conditions, require the landlord to provide a written repair scope, a contractor estimate, and a completion deadline before lease commencement. If the landlord won’t commit in writing, that’s your answer.
Deal-stopper: pause or walk away
- Active foundation settlement with ongoing movement (not historical)
- Bowed or bulging basement walls indicating active lateral pressure
- Widespread spalling concrete in structural members
- Sagging floor or roof members suggesting structural failure
- Active water infiltration with no identified source or remediation plan
- Severe mold growth throughout the crawl space, basement, or HVAC system
- Compromised egress or non-functional fire protection systems
These conditions represent safety risks and capital exposures that a landlord repair commitment alone may not resolve quickly enough. For any deal-stopper condition, require either a fully completed and warranted repair before you take possession, or walk away. An escrow holdback is appropriate for moderate concerns; it’s not an adequate substitute for a completed repair when structural safety is at stake.
What do inspections and remediation typically cost?
Cost ranges vary by property size, location, and condition severity. The figures below reflect typical U.S. market ranges for the services most relevant to a pre-lease structural evaluation.
The OPC in a PCR is what connects these ranges to your specific property. Per ASTM E2018, the PCR should include opinions of probable cost for each identified deficiency, which means a well-executed PCA gives you a defensible cost estimate you can put directly in front of the landlord. Understanding what foundation repair actually costs before you negotiate is the difference between accepting a lowball landlord credit and knowing what the work actually requires.
One important caveat: ASTM E2018 explicitly notes that PCRs should state scope limitations, and that some deficiencies require invasive investigation or specialized testing to fully quantify. If the PCR flags a concern but can’t fully price it without additional testing, budget for that testing before you finalize your negotiation position.
A thorough pre-lease inspection that includes document review and photographs frequently uncovers deferred maintenance and service-life concerns in roofing, HVAC, and foundation systems that materially affect your total cost of occupancy over the lease term.
How do you negotiate repair responsibilities and protective lease language?
An inspection report without lease language to back it up is just a document. The goal is to convert PCR findings into enforceable obligations before you sign.
Negotiation options, ranked by tenant protection
- Landlord completes repairs before lease commencement. The strongest position. Require a signed contractor scope, a completion deadline, and a post-repair inspection right before you take possession.
- Landlord funds an escrow or holdback. Appropriate for moderate concerns where repair timing is uncertain. The escrow amount should equal or exceed the OPC for the identified deficiency. Funds release to the landlord only upon documented completion.
- Tenant improvement (TI) allowance tied to OPC. The landlord credits you a dollar amount against rent or build-out costs. Acceptable when the repair is within your scope of work, but make sure the credit reflects the actual OPC, not a negotiated-down estimate.
- Rent reduction tied to identified deferred maintenance. Appropriate when the condition is ongoing and the landlord won’t repair it. The reduction should reflect the cost of managing the condition over the lease term.
- Tenant termination right. A clause allowing you to terminate the lease without penalty if specified conditions are not remediated by a defined date. This is your backstop for moderate-to-serious concerns.
Lease clauses to request
- Repair responsibility clause: Specifies which party is responsible for each category of repair, with explicit reference to the PCR findings.
- Completion deadline clause: Sets a hard date for landlord repairs with a remedy (rent abatement, termination right) if the deadline is missed.
- OPC reliance clause: States that the tenant’s lease decision was made in reliance on the PCR’s opinions of probable cost, and that material discrepancies discovered post-signing trigger a renegotiation right.
- Landlord warranty clause: The landlord warrants that identified deficiencies will be remediated to a specified standard before lease commencement.
- Termination right clause: Tenant may terminate without penalty if structural conditions exceed defined thresholds or if landlord repairs are not completed by a specified date.
Before signing any lease where a PCR has identified material deficiencies, confirm that every repair commitment is written into the lease itself, not just in a side letter or email exchange. Side letters are frequently unenforceable or overlooked at renewal. The lease is the document that governs.
Documents to secure before final signing
- The complete PCR with all photographs and OPCs
- Contractor estimates for any landlord-committed repairs
- Proof of completion (signed contractor certificate, dated photographs)
- Copies of any permits pulled for structural work
- Warranties from contractors who performed repairs
For more on how structural damage disclosure works in rental contexts, and what landlords are typically required to disclose, review your state’s landlord-tenant statutes alongside the PCR findings.
What remediation options exist, and how does a repair provider evaluate the work?
When a PCR identifies a structural deficiency, the next question is what fixing it actually involves. Here’s a plain-language overview of the most common remediation types and what each addresses.
- Foundation piering (push piers or helical piers): Used to stabilize and, in some cases, lift a foundation that has settled. Piers are driven to load-bearing soil or bedrock beneath the problem area. Appropriate for differential settlement and active foundation movement.
- Structural stabilization (wall anchors, carbon fiber straps): Used for bowed or bulging basement or crawl-space walls under lateral soil pressure. Carbon fiber straps resist further movement; wall anchors can be tightened over time to gradually restore alignment.
- Crawl space encapsulation: A vapor barrier system that seals the crawl space from ground moisture, combined with drainage and dehumidification. Addresses moisture-driven wood rot, mold, and air quality concerns.
- Basement waterproofing: Interior drainage systems, sump pumps, and wall sealants that manage water infiltration at the foundation perimeter. Addresses active water intrusion without necessarily requiring exterior excavation.
- Concrete leveling: Polyurethane foam injection or mudjacking to lift and level settled concrete slabs in driveways, walkways, and parking areas. Less invasive and faster than full replacement.
- Mold remediation: Physical removal of mold-affected materials, treatment of affected surfaces, and correction of the moisture source. The moisture source must be addressed or mold returns.
A reputable remediation provider’s scope of work should translate directly from the PCR findings. It should include a description of the specific repair method, the area of work, the timeline, permit requirements, cleanup responsibilities, and warranty terms. If a contractor hands you a one-line estimate with no scope detail, ask for a written scope before signing anything.
Trust signals to look for in a remediation proposal: photographs of the specific problem area, a cost estimate that references the PCR’s OPC, references or case studies from comparable projects, and clear warranty language. Financing options are worth asking about too, particularly for larger foundation or waterproofing scopes where the cost may affect lease negotiation timing.
What should you do after you receive the inspection findings?
Once you have the PCR or inspection report in hand, the decision tree is straightforward. The severity of findings drives the path.
- Minor findings only (informational level): Accept the property. Document the conditions in writing to the landlord before move-in. Request that the landlord acknowledge the pre-existing conditions in writing.
- Moderate findings with clear OPCs: Negotiate. Present the PCR findings and OPCs to the landlord. Request one of the repair options described above (landlord repair, escrow, TI allowance). Set a deadline for the landlord’s response before your contingency expires.
- Serious findings requiring engineering evaluation: Pause. Commission a PE evaluation before proceeding. Do not let the contingency expire while you’re waiting for engineering results. Request an extension in writing.
- Deal-stopper findings: Require fully completed and warranted repairs before commencement, or exercise your termination right. Do not accept a landlord’s verbal assurance that repairs will be made after you move in.
- Landlord refuses to negotiate or repair: Walk away. A landlord who won’t address documented structural deficiencies before signing will not address them after. The PCR is your evidence that you acted in good faith.
The person who signs off at each step matters. For minor findings, a property manager’s written acknowledgment is sufficient. For moderate to serious findings, require sign-off from the property owner or their authorized representative, not just a leasing agent. For any repair completion, require a signed contractor certificate and dated photographs, not just a landlord’s confirmation.
For properties with multiple structural concerns across a portfolio, the negotiation strategies for repair costs across a property portfolio are worth reviewing before you finalize your position.
What tenants consistently get wrong about structural inspections
The most common mistake isn’t skipping the inspection. It’s treating the inspection as a formality rather than an evidence-gathering exercise.
Tenants who rely on a visual walkthrough alone, accept verbal landlord assurances, or skip the OPC step consistently end up in the same place: they move in, discover a problem the inspection would have caught, and have no documented basis for holding the landlord responsible. The landlord’s position is always the same: “You accepted the property as-is.”
The second most common mistake is poor documentation. A photograph without a timestamp, a location reference, or a scale object is nearly useless in a dispute. An email that says “I noticed some cracks” without attaching the photographs is worse than nothing because it acknowledges you saw something without proving what it was.
The OPC is what separates a negotiation from a complaint. One scenario that illustrates this: a prospective commercial tenant receives a PCR that flags deteriorated crawl-space framing and elevated moisture levels. The PCR includes an OPC of $18,000 for encapsulation and joist repair. The tenant presents that figure to the landlord and negotiates a $15,000 TI allowance credited against the first year’s rent. Without the OPC, that conversation would have been the tenant saying “there’s some damage down there” and the landlord saying “we’ll look into it.” The dollar figure is what makes the conversation real.
Foundationresq turns inspection findings into completed repairs
When a PCR or structural inspection identifies foundation movement, water intrusion, crawl-space deterioration, or mold, the next step is a remediation provider who can translate those findings into a scoped, warranted repair. Foundationresq serves residential and commercial property owners across North Florida, South Georgia, and Alabama with exactly that scope: foundation repair, basement waterproofing, crawl space encapsulation, concrete leveling, and mold remediation.
What you get when you engage Foundationresq: a free on-site inspection, a written scope of work tied to the specific deficiencies identified, clear timelines, and financing options for larger repairs. Every proposal includes the detail a PCR-backed negotiation requires: photographs, specific repair methods, and warranty terms. If your inspection report flagged something and you need a repair estimate that holds up in a lease negotiation, request a free inspection and get a written scope before your contingency expires.
Sources
The following standards and resources were used in preparing this guide. Reviewing the primary sources directly is worthwhile, particularly for commercial transactions where the PCA methodology governs the defensibility of your findings.
- E2018 Standard Guide for Property Condition Assessments: Baseline Property Condition Assessment Process
- Pre-Lease Commercial Inspection in San Diego County, CA: What You Need to Know Before You Sign – Commercial Property Inspections in Southern California
- Commercial Lease Inspection Checklist
A note on interpreting ASTM E2018: the standard sets a baseline process, not a guarantee. A PCR prepared under E2018 tells you what a qualified professional observed and what it likely costs to fix. It does not certify that the building is structurally sound, and it does not cover conditions that were concealed, inaccessible, or outside the agreed scope. Always read the scope limitations section of any PCR before relying on it in negotiations.
FAQ
What is a structural risk assessment for a leased property?
A structural risk assessment evaluates a building’s physical condition to identify deficiencies that affect safety, habitability, or long-term cost. For commercial properties, this typically means a Property Condition Assessment (PCA) conducted under ASTM E2018, which produces a PCR with opinions of probable cost for each identified deficiency.
What should a structural risk assessment include?
At minimum: a physical walk-through of all accessible areas, a review of available maintenance and repair records, photographs of observed conditions, and written opinions of probable cost for identified deficiencies. A PCA under ASTM E2018 formalizes all five elements and specifies what was excluded from the scope.
What is an example of a structural risk in a leased building?
Active foundation settlement is a clear example: floors slope noticeably, doors and windows bind, and diagonal cracks appear at wall corners. Other examples include bowed basement walls under lateral soil pressure, sagging floor joists from wood rot or overloading, and active water infiltration through foundation walls or the roof system.
What are structural risks in a property lease context?
Structural risks are physical conditions that threaten the building’s load-bearing capacity, weather resistance, or habitability, and that can generate unexpected capital costs for the tenant. They include foundation movement, deteriorated framing, failing roofs, active water intrusion, and compromised fire or egress systems. Identifying these before signing lets you negotiate repairs, credits, or termination rights rather than inheriting the cost.
When should a tenant walk away based on inspection findings?
Walk away, or require fully completed and warranted repairs before commencement, when findings include active foundation settlement, bowed structural walls, widespread mold throughout mechanical systems, active water infiltration with no remediation plan, or compromised egress and fire protection. A landlord who won’t address these conditions in writing before you sign will not address them after.
Recommended
- Rental Property Structural Damage Disclosure Guide – Tallahassee Foundation Repair | Foundation ResQ
- Commercial Building Foundation Inspection Checklist: 2026 Property Manager’s Guide – Tallahassee Foundation Repair | Foundation ResQ
- Structural Repair ROI: What Homeowners Need to Know – Tallahassee Foundation Repair | Foundation ResQ