
Use epoxy injection when a basement wall crack is dry, stable, and narrower than about a quarter inch. Skip it if the crack is wet, actively widening, or shows horizontal or stair-step patterns that indicate structural issues. Those signs point to polyurethane injection or a professional structural inspection instead. When in doubt, get the crack looked at before you buy anything.
TL;DR:
- Epoxy injection is suitable only for dry, stable cracks narrower than a quarter inch, while polyurethane is better for wet, leaking, or widening cracks.
- Proper injection requires thorough crack cleaning, port placement every 4 to 8 inches, and pressure control between 20 to 40 PSI to ensure full-depth fill without damaging the wall.
- Costs vary from DIY kits for small cracks to professional services costing between $250 and $800 per crack, with certain signs like horizontal or wider cracks indicating the need for expert evaluation.
- Epoxy provides a lasting structural bond if the crack is dry and stable, but ongoing foundation movement or water pressure can undermine the repair over time.
- Getting a professional inspection is crucial before choosing epoxy or polyurethane injection, especially for cracks showing signs of structural shifting or moisture infiltration.
Table of Contents
- Basement Crack Injection: Epoxy vs. Polyurethane
- How Basement Crack Injection Actually Works
- How Do You Inject a Basement Crack With Epoxy?
- What Tools Do You Need for Basement Crack Injection?
- Injection Pressure and Port Spacing: The Numbers That Matter
- Curing Time and the Mistakes That Ruin a Repair
- What Does Basement Crack Injection Cost?
- What Basement Crack Injection Won’t Fix
- Why an Inspection Beats Guessing
- The Editorial Take on Crack Injection
- Get a Professional Read on Your Basement Cracks
- Sources
- FAQ
Basement Crack Injection: Epoxy vs. Polyurethane
The material choice comes down to one question: is the crack dry or wet? Epoxy is rigid once cured and bonds concrete faces back together, which restores structural continuity to the wall. It needs a completely dry substrate to work, because moisture blocks proper adhesion. Polyurethane foam, by contrast, is flexible after cure and actually reacts well with water. It expands to fill voids and stop active leaks, which makes it the right choice for wet or actively leaking cracks.
Run through this before buying a kit:
- Is the crack dry to the touch and has it stayed dry through a rain event? Epoxy is on the table.
- Is water present, seeping, or has it leaked in the past? Polyurethane first.
- Is the crack widening, or is there any vertical offset? Stop and call a professional.
- Is your goal structural repair or waterproofing? Epoxy restores strength; polyurethane seals water out.
Some contractors combine both: inject polyurethane first to stop water intrusion, wait four to seven days for the substrate to dry, then follow with epoxy once structural bonding is the goal.
How Basement Crack Injection Actually Works
Epoxy injection works by forcing low viscosity resin through the full depth of a crack until it bonds both faces of the concrete back together. Once cured, the epoxy can exceed the compressive strength of the surrounding concrete, which is why contractors treat it as a structural fix rather than a cosmetic patch.
Good candidates for epoxy share a few traits:
- Vertical or diagonal cracks in a poured concrete foundation wall
- Crack width under roughly a quarter inch
- No active movement, meaning the crack hasn’t grown wider or longer recently
- Dry surface with no active water intrusion
Epoxy is the wrong tool for horizontal cracks, stair-step patterns in block walls, or cracks with a visible offset where one side sits higher than the other. Those patterns usually signal ongoing structural movement that needs engineer evaluation, not an injection alone.
How Do You Inject a Basement Crack With Epoxy?
The process is sequential, and skipping a step is the most common reason DIY jobs fail. Here’s the order that works:
- Clean the crack. Wire brush or grind loose debris and dust out of the crack, then let it dry completely. Any moisture defeats epoxy adhesion.
- Mark and drill injection ports. Space ports 4 to 6 inches apart on narrow cracks and 6 to 8 inches apart on cracks wider than 1/16 inch, angled to intersect the crack at its midpoint.
- Seal the surface. Apply a surface-seal paste along the entire visible crack and around each port base. This paste is what holds pressure during injection, so let it cure per the label before moving on.
- Start at the lowest port. Inject slowly at 20 to 40 PSI, working bottom-up port to port.
- Watch the adjacent port. When epoxy appears at the next port up, plug the lower one and shift the injection gun upward. This is the field-standard way to confirm full-depth penetration rather than a surface-only fill.
- Repeat to the top, then let the epoxy cure fully before removing ports and grinding the surface seal flush.
Pro Tip: Mix two-part epoxy in small batches and use it within the manufacturer’s working time window. A cartridge that sits too long starts to set inside the mixing nozzle, and a clogged nozzle mid-injection means starting the port over.
A hand-pump gun works fine for a single crack. If you’re doing several cracks in one basement, a two-component metering pump keeps the resin ratio consistent, which matters more than most DIYers assume, since an off-ratio mix cures soft or brittle.
What Tools Do You Need for Basement Crack Injection?
A basic DIY kit covers the essentials: injection ports, surface-seal paste, two-part epoxy cartridges, and a caulk-gun style dispenser. That’s enough for one or two small, dry, stable cracks.
Professional crews carry more:
- Two-component metering pumps that mix resin and hardener at a fixed ratio under pressure
- Contractor-grade cartridges in larger volumes than retail kits
- Extension hoses and multiple gun heads for injecting from awkward angles
- Moisture meters to confirm a crack is genuinely dry before committing to epoxy
What most retail kits leave out is diagnostic equipment. A homeowner kit assumes you’ve already correctly identified the crack as dry and stable. If that assumption is wrong, the kit won’t tell you.
Injection Pressure and Port Spacing: The Numbers That Matter
Pressure and spacing aren’t guesswork. Industry best practice sets low-pressure epoxy injection at 20 to 40 PSI, enough to push resin through a hairline crack without blowing out the surface seal or fracturing surrounding concrete.
| Crack width | Port spacing | Injection pressure |
|---|---|---|
| Under 1/16 inch | 4 to 6 inches | 20 to 40 PSI |
| 1/16 inch to 1/4 inch | 6 to 8 inches | 20 to 40 PSI |
Full-depth fill is confirmed the same way every time: resin shows up at the next port before you move up. Overpressurizing past that range doesn’t speed up the job. It risks creating new fractures in concrete that was never designed to take that load from the inside.
Curing Time and the Mistakes That Ruin a Repair
Cure time varies by product, but most two-part epoxies reach handling strength within 24 hours and full cure within a few days, depending on temperature and humidity. Cold basements slow cure considerably.
Verification happens during the injection itself, not after: material at the next port confirms depth, and a firm, tack-free surface after the stated cure window confirms the resin set correctly. Three mistakes account for most failed DIY attempts:
- Injecting epoxy into a crack that looks dry but has residual moisture inside
- Skipping ports and jumping around instead of working strictly bottom-up
- Cranking pressure up when flow seems slow instead of troubleshooting the port seal
What Does Basement Crack Injection Cost?
DIY epoxy kits run cheap per crack, usually enough for one or two injection jobs in a single purchase. Professional injection typically runs $250 to $800 per crack depending on wall thickness, crack length, and access. Many contractors also carry a minimum service call charge regardless of how small the job is.
Red flags that should send you toward a professional inspection instead of a kit purchase:
- Horizontal or stair-step cracking, especially in block foundations
- Any visible offset where the wall has shifted out of plane
- Cracks wider than a quarter inch or ones that have grown in the past few months
- Bowing or leaning along the wall, not just at the crack itself
A proper contractor inspection should include a look at the whole wall, not just the crack, plus a check for drainage issues outside that might be driving the movement. See what typically drives crack repair pricing for a fuller cost breakdown by scope.
What Basement Crack Injection Won’t Fix
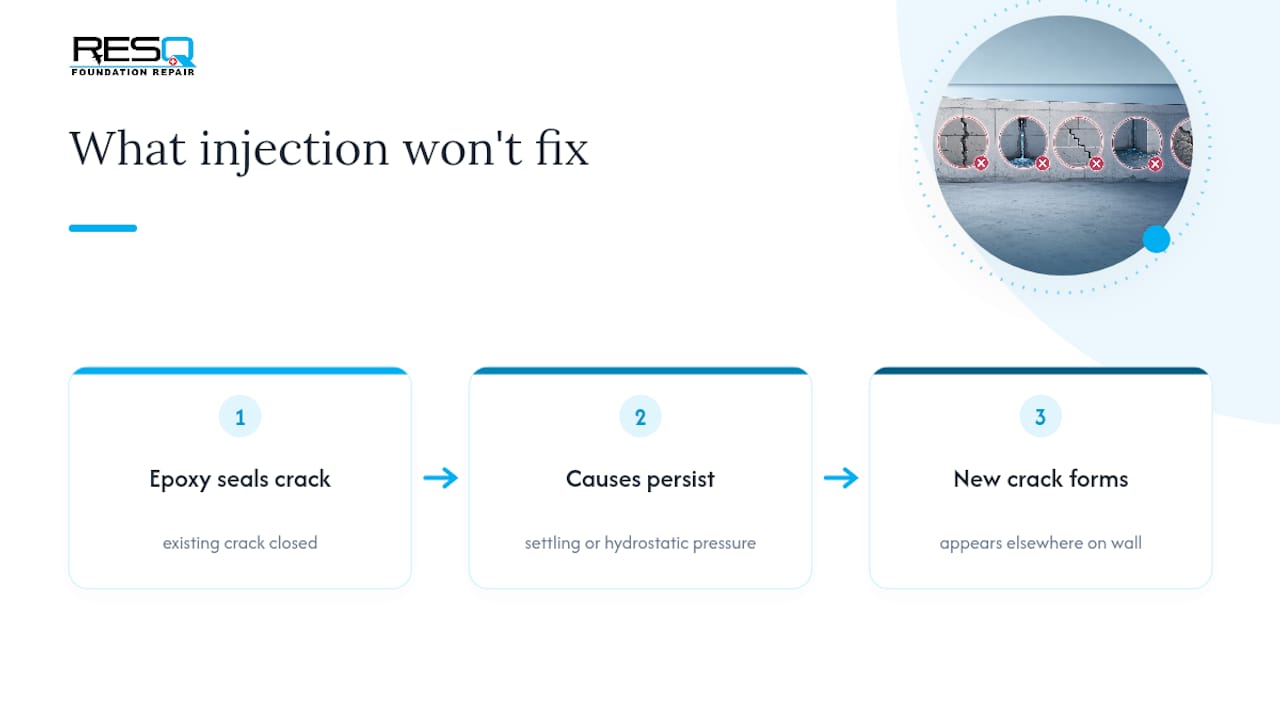
Injection repairs the crack. It does not stop the reason the crack formed in the first place. If a foundation is still settling, or hydrostatic pressure outside the wall is building year after year, epoxy will hold the existing crack shut, but a new one can open somewhere else on the same wall.
Safety matters more than most DIY guides mention.
Pro Tip: If your basement has a history of seepage beyond the cracked area, injection alone won’t address it. Pair crack repair with interior waterproofing and drainage so water pressure doesn’t just find the next weak point.
Why an Inspection Beats Guessing
Foundation RESQ’s inspection process starts by identifying whether a crack is cosmetic, structural, or water-driven before recommending a repair path. That distinction is exactly where DIY diagnosis goes wrong most often. When a crack pattern is ambiguous, a professional look, backed by real project examples, settles the question faster than another round of internet research.
The Editorial Take on Crack Injection
Most basement crack guides oversell epoxy as a universal fix. It isn’t. The research is clear that epoxy only performs where it’s supposed to: dry, stable, narrow cracks in poured concrete. Push it onto a damp crack or a wall that’s still moving, and you get a repair that looks fine for a season and fails quietly underneath.
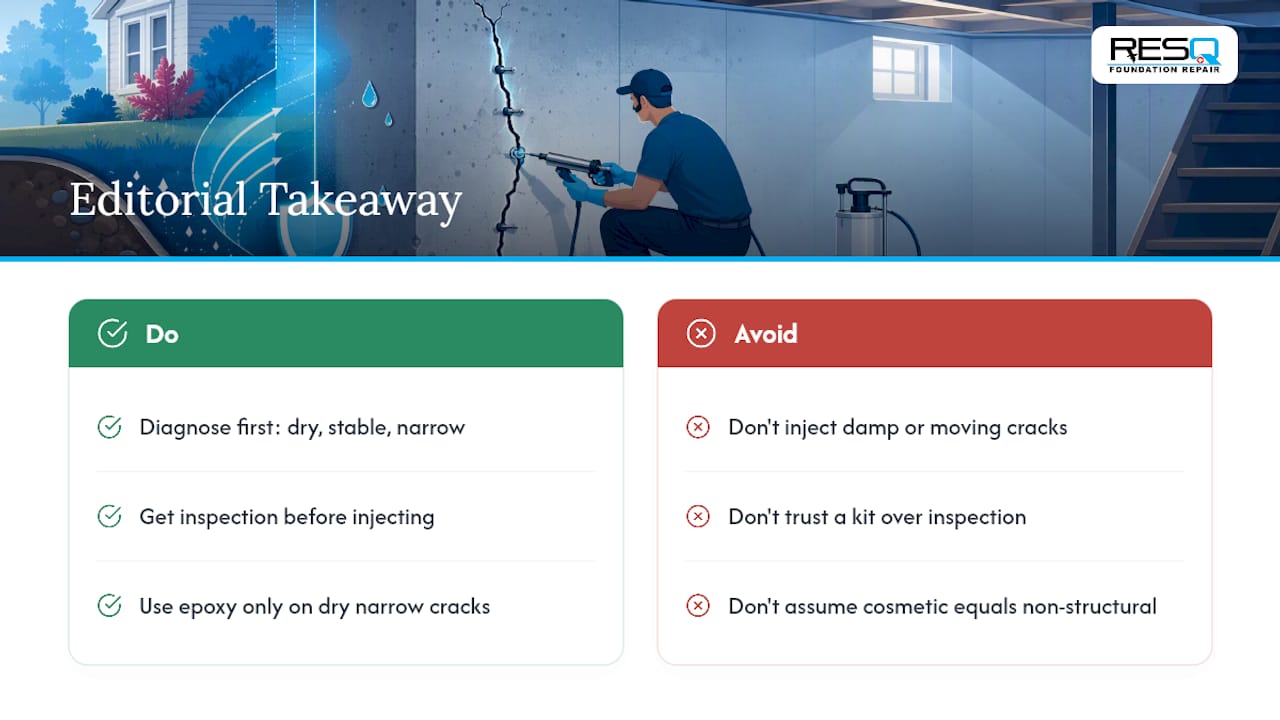
The bigger blind spot in conventional advice is diagnosis, not technique. Homeowners get detailed instructions on port spacing and PSI, but almost no guidance on how to tell a cosmetic crack from a structural one before they ever pick up a caulk gun. That’s backwards. Get the diagnosis right first: dry or wet, stable or moving, narrow or wide. The injection method itself is almost mechanical once you know which material belongs in the crack.
If there’s one thing worth prioritizing, it’s this: don’t let a $30 kit talk you out of a $0 inspection. A wrong material choice costs you the price of the kit and the time it takes to redo the job correctly, sometimes after water has already gotten further into the wall.
— Kayle
Get a Professional Read on Your Basement Cracks
If your crack checks out as a DIY candidate, a kit and an afternoon might genuinely solve it. But if you’re staring at a crack that’s wet, widening, or paired with a bowing wall, guessing wastes both the material cost and the time before the real problem gets worse. Professional inspections check the crack in context, including the whole wall, drainage conditions, and movement history, not just the visible gap.
A professional service visit usually includes a full diagnosis, a written repair scope, and a look at financing options if the job goes beyond a simple injection. Request a free inspection through our services page and find out exactly what’s driving the crack in your basement before you decide how to fix it.
Sources
- Science behind low-pressure crack injection repair
- How to fix cracks in concrete — This Old House
- Crack Injection: Epoxy vs Polyurethane Foundation Repair
- Foundation crack repair guide — DryBasementHub
FAQ
How Do I Inject Cracks in My Basement Wall?
Clean and dry the crack, install ports every 4 to 8 inches depending on width, seal the surface, then inject epoxy or polyurethane bottom-up at 20 to 40 PSI until material appears at the next port up.
Do Concrete Crack Fillers Really Work?
Surface fillers and caulk only mask a crack cosmetically and don’t restore structural bond; full-depth epoxy or polyurethane injection is what actually seals or reinforces the crack through the entire wall thickness.
What Is the Best Crack Filler for a Basement Floor?
For dry, stable floor cracks, a two-part epoxy restores structural bond; for damp or actively seeping floor cracks, polyurethane is the better choice because it tolerates moisture and stays flexible.
How Long Does Foundation Crack Injection Last?
Epoxy injection can last the life of the structure if no further movement occurs, while polyurethane typically lasts 5 to 10 years on cracks that continue to shift slightly with seasonal changes.