
Put the sump basin at the lowest point of the basement or crawl space floor, wherever the foundation drainage or drain tile actually terminates. That is the only location that lets gravity do its job. Before anyone cuts slab, confirm the real drain route and leave enough clearance around the pit for a pump swap. If the flow path is not obvious, get a professional trace first. Guessing wrong here means moving concrete twice.
TL;DR:
- Proper sump basin placement depends on tracing the actual drainage route rather than relying on visible puddles or surface low points, especially in finished or complex basements.
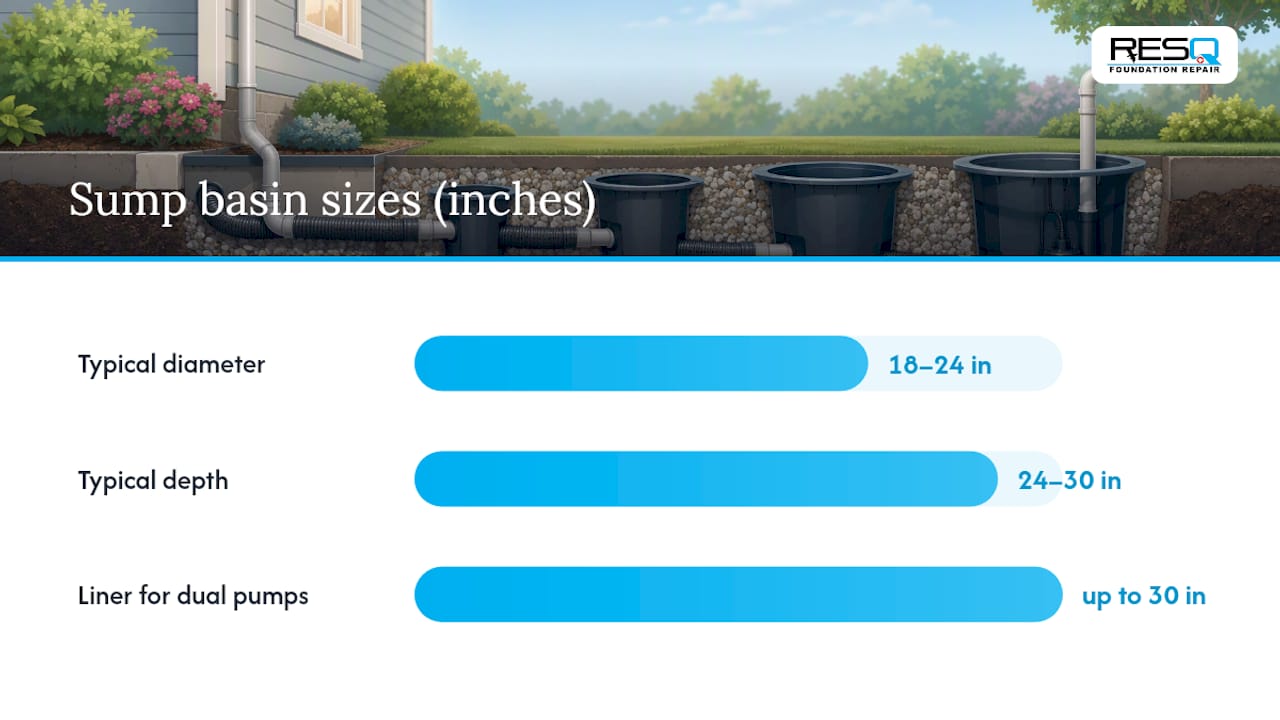
- Most residential basins should be 18 to 24 inches in diameter and at least 24 inches deep, with larger liners preferred for homes with dual pumps or higher inflow demands.
- Clearances around the basin are critical; avoid tight placements against footings or under stairs to ensure pump servicing and safe discharge line routing.
- Sizing the basin for peak inflow conditions is more important than exact placement, as an undersized basin causes short cycling and early pump failure.
- Homeowners should always consult professionals to verify drain tile paths, utilities, and structural constraints before slab cutting to prevent costly mistakes.
Table of Contents
- How Do You Confirm the Right Spot for a Sump Basin?
- What Size and Depth Should a Sump Basin Be?
- What Clearances and Utility Rules Affect Basin Placement?
- How Do You Install a Sump Basin Correctly?
- How Often Should You Check a Sump Basin?
- When Should You Call a Professional for Sump Basin Placement?
- Does Soil Type Change Where the Basin Should Go?
- What Building Codes Apply to Sump Basin Installation?
- How Do You Avoid Hitting Utilities When Placing a Sump Basin?
- How Do Groundwater Levels Change Sump Basin Placement?
- What Safety Precautions Matter During Sump Basin Installation?
- The Real Priority Behind Sump Basin Placement
- Get a Professional Assessment Before You Cut Slab
- Sources
- FAQ
How Do You Confirm the Right Spot for a Sump Basin?
A wet patch on the floor is a hint, not proof. Basements settle unevenly, and surface puddling can trick you into cutting a hole in the wrong place. The Building America Solution Center is direct on this: install the sump at the lowest portion of the foundation where the drainage system or groundwater can actually reach it, not just where water happens to pool on a rainy afternoon.
Confirming the real inflow path takes a few checks before anyone breaks concrete:
- Trace visible drain tile openings, floor drains, or wall weep holes back toward their likely low point.
- Run a hose test near suspected entry points and watch where water actually travels across the floor.
- Check for a slight slope in the slab. Concrete floors are rarely dead level, and the pitch usually tells the real story.
- Look at old water stains or efflorescence lines. They mark where moisture has traveled before, sometimes over years.
A visible low spot is only a clue; the actual placement has to match the sub-slab drainage route and whether a tie-in is even feasible. If the basement is finished, if there are multiple wet areas, or if nobody knows where the original drain tile runs, that is the point to call a contractor for a camera trace or slab probe instead of guessing.
What Size and Depth Should a Sump Basin Be?
Most residential sump basins run 18 to 24 inches in diameter and 24 to 30 inches deep, though liners as large as 30 inches across are common when a home runs dual pumps or handles heavier inflow. A single small pump in a shallow basin might empty and refill every few minutes during a storm. That short cycling burns out motors early, so bigger volume usually means fewer, longer pump cycles and less wear.
Quick sizing math: if your pump moves 20 gallons per minute (GPM) and you want at least a 2-minute run time before it needs to cycle again, you need roughly 40 gallons of usable capacity, factoring in the basin’s diameter, depth, and the water level the float allows before shutoff. A basin sized too small forces the pump to short cycle no matter how good the pump is.
Two liner types cover almost every situation:
- Perforated liners work when drain tile or gravel feeds the pit and the soil needs a path in from multiple directions.
- Solid liners fit when only piped inflow reaches the basin, or when sediment control and radon sealing matter more than broad water collection.
On materials and covers, ASPE/IPC guidance calls for basins at least 18 inches in diameter and 24 inches deep, with valves kept accessible above the cover or in a dedicated access pit. Choose a gasketed, load-rated cover, especially for indoor air quality if the basin will sit under living space.
What Clearances and Utility Rules Affect Basin Placement?
Even a textbook low point can be the wrong spot if you cannot service the pump once it is in the ground. A pit jammed against a footing or wedged under a stair stringer might drain water perfectly and still cause headaches for years, because nobody can lift the pump out without demolition.
A few clearance rules apply regardless of soil or drain layout:
- Leave enough open floor space around the pit to pull the pump straight up without hitting a wall or joist.
- Keep the float switch’s swing radius clear of the basin wall, pump housing, or discharge pipe.
- Route the discharge line as short and direct as possible. Shorter runs cut total dynamic head, which means a smaller, cheaper pump can still move the same water.
- Slope discharge piping away from the foundation, and think through freeze exposure if the line runs above grade in winter.
- Install a dedicated GFCI-protected outlet near the pit. Never run the pump off an extension cord or a shared circuit.
Pro Tip: Avoid placing the pit under built-in cabinetry, a finished closet floor, or anywhere the float arm could snag on a stored box. The basin that’s easiest to forget about is the one that fails at 2 a.m. during a storm.
How Do You Install a Sump Basin Correctly?
Getting the location right is half the job. The other half is installing it so the basin actually receives the water it was placed to catch.
- Measure and mark the confirmed low point, keeping the layout clear of footings, joists, and buried lines.
- Cut the slab with enough clearance for the liner plus a few inches of working room on all sides.
- Excavate slightly larger than the liner itself, angling the sides to keep loose soil from caving in during backfill.
- Lay a washed gravel base at the bottom of the hole. A gravel bed under the liner keeps sediment from clogging the pump intake.
- Wrap perforated liners in filter fabric if drain tile feeds the pit, then set the liner and backfill around it with more washed gravel.
- Tie in existing drain tile to the liner’s inlet ports if the home already has a foundation drainage system.
- Install the pump, then set a check valve 12 to 18 inches above the basin rim on the discharge line to stop water from flowing back down when the pump shuts off.
- Test the float and pump through several full cycles before sealing anything permanently.
- Seal the slab rim with concrete patch and fit a gasketed, load-rated cover once the test cycles run clean.
Skipping the filter fabric or the gravel bed is the most common shortcut that causes early pump failure, since sediment works its way in and wears down the impeller within a couple of seasons.
How Often Should You Check a Sump Basin?
Check float movement, debris buildup, and pump start behavior about every three months, more often during a wet season. Lift the float by hand to confirm the pump kicks on and shuts off cleanly, and clear any silt or leaves that have settled around the intake screen. Gravel and filter fabric around a perforated liner slowly clog over years and may need rinsing or replacement if cycle times start creeping up.
Placement mistakes show up here first. A basin tucked under a staircase or behind built-in storage turns a five-minute pump swap into an hour of demolition and reassembly, and that friction is exactly why some homeowners let a failing pump run too long before calling for help assessing performance.
Frequent short cycling almost always traces back to basin size, not the pump itself. A wider basin holds more gallons per inch of water level, which means longer run times and fewer starts per hour.
- Confirm the alarm or backup pump sits high enough to trigger before water reaches finished flooring.
- Battery backup systems need their own accessible spot near the basin, not buried behind boxes.
Pro Tip: If you notice the pump cycling every few minutes during steady rain, that is a sizing problem, not a pump problem. Upsizing the basin often solves it faster than replacing the pump.
When Should You Call a Professional for Sump Basin Placement?
Some situations are not DIY territory, no matter how handy you are with a hose test and a tape measure. Finished basements, homes with multiple wet spots, or a drain tile system nobody has documented all call for a professional look before any concrete gets cut.
A proper inspection verifies things a homeowner cannot always confirm alone: the actual drain tile route under the slab, footing and structural clearances, buried electrical or plumbing lines near the proposed pit, and a safe discharge point that will not just move water back toward the foundation. Foundation RESQ’s inspection process covers all of that before recommending a location, which matters most when the visible low point and the true drainage path do not line up. If your home has an unclear drain history or a basement that already needs waterproofing work, that inspection is the step that prevents a second excavation down the road.
Does Soil Type Change Where the Basin Should Go?
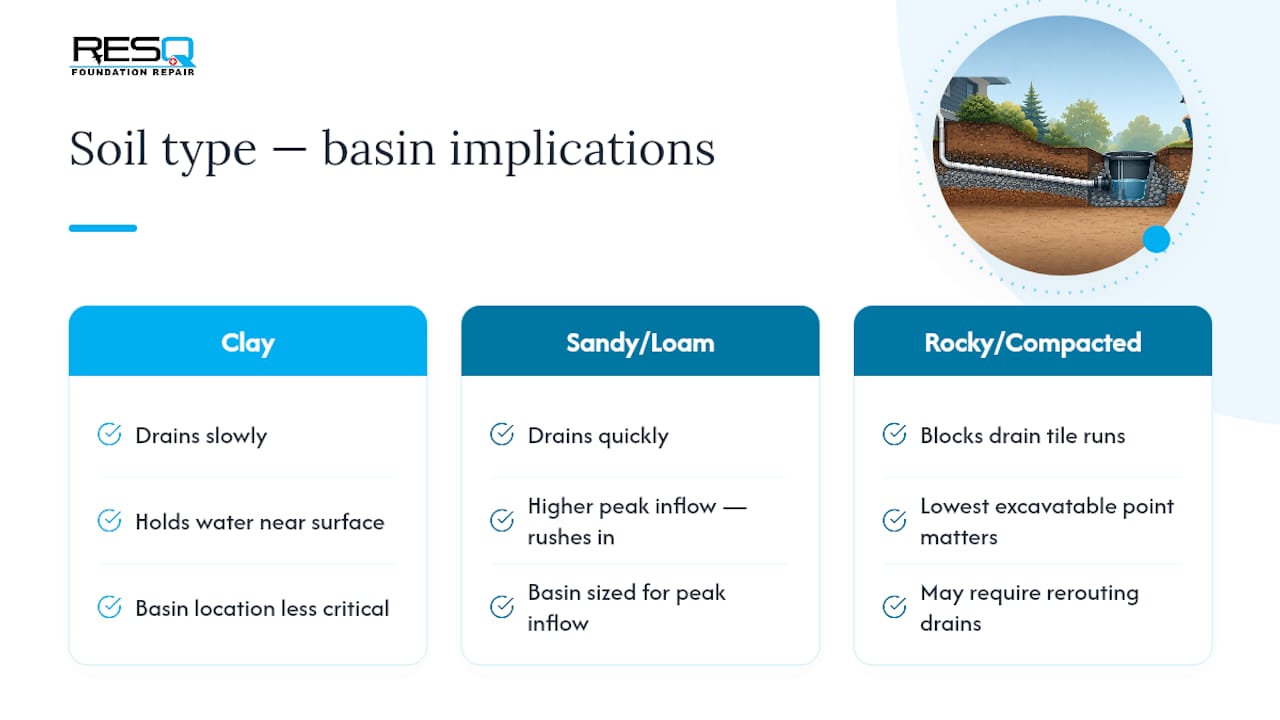
Soil composition shapes both where water collects and how fast a sump basin needs to move it. Clay-heavy soil drains slowly and holds water near the surface longer, which often means water pressure builds against foundation walls before it ever reaches a drain tile system. In that setup, the basin location matters less than making sure the perimeter drain tile has enough perforated liner surface to catch runoff before it saturates the slab edge.
Sandy or loamy soil drains faster and lets groundwater move more freely underground, which can mean higher water tables during wet seasons but faster relief once the pump kicks on. Homes on sandy soil often need a basin sized for higher peak inflow rather than constant low-volume seepage, since the water arrives in a rush rather than a slow trickle.
Rocky or heavily compacted soil creates a different problem entirely: it can block drain tile from reaching the basin efficiently, forcing installers to reroute the perimeter drain rather than fight the excavation. In these cases, the placement decision often shifts from “lowest visible point” to “lowest point that is actually excavatable,” which is exactly the kind of call worth confirming with a soil-aware contractor before cutting slab.
Regional clay content, water table depth, and drainage patterns vary block to block, so a neighbor’s setup is not always a reliable template for yours.
What Building Codes Apply to Sump Basin Installation?
Most municipalities treat sump basin installation as plumbing work, which usually means a permit and an inspection before the system goes live. Requirements vary significantly by city and county, so the specific permit process, inspection checklist, and inspection fee depend entirely on local code offices rather than any single national standard.
That said, a few themes show up across most jurisdictions that follow International Plumbing Code (IPC) principles. Discharge lines typically cannot connect directly to sanitary sewer systems in many areas, since sump water is considered stormwater or groundwater, not wastewater. Backflow prevention, usually a check valve on the discharge line, is a near-universal requirement rather than a suggestion. Electrical work for the pump circuit, particularly the GFCI-protected outlet, often falls under a separate electrical permit depending on local rules.
Before cutting into a slab, check with the local building department about permit requirements for both the plumbing tie-in and any electrical work tied to the pump circuit. Skipping this step will not just risk a fine; it can complicate a home sale later if an inspector flags unpermitted work. A licensed contractor pulling the permit on your behalf also puts inspection liability on their license rather than yours, which matters if something goes wrong down the line.
How Do You Avoid Hitting Utilities When Placing a Sump Basin?
Cutting a slab without checking what runs underneath it is how a straightforward sump installation turns into an expensive repair job. Before marking the excavation area, call 811 or your local utility locator service to have underground gas, electrical, and water lines marked, even for interior slab work, since some utilities run beneath basement floors in older homes.
Sewer lateral lines and existing plumbing stacks are common culprits for interior surprises. A basin placed too close to a sewer line risks undermining the pipe’s support during excavation, and a basin placed directly over one may require rerouting the sewer line entirely, which adds cost and time nobody planned for.
Radiant heating lines, if the home has an in-slab system, are another reason to verify layout before cutting. These lines are not always visible on standard utility locates since they are not classified the same as gas or water lines, so checking original construction drawings or asking a previous owner about known slab systems is worth the extra step.
If the proposed low point sits near any of these obstacles, the practical fix is usually to shift the basin a foot or two and accept a slightly less optimal gravity path, or to reroute the interior drain tile toward a cleaner location. Either option beats discovering a gas line mid-excavation.
How Do Groundwater Levels Change Sump Basin Placement?
Groundwater tables rise and fall with the seasons, and that shift changes how a sump system performs even when the basin location never moves. Spring thaw and heavy rain seasons push water tables higher, increasing the volume and speed of inflow into a properly placed basin. Late summer and drought conditions often drop the table low enough that the same basin barely cycles for weeks.
This seasonal swing matters most for sizing decisions, not for choosing a completely different spot. A basin placed correctly at the lowest drainage point will still handle seasonal changes, but only if it was sized for peak flow rather than average conditions. A pump and basin combination that handles a light spring rain with room to spare can struggle during a multi-day storm system if the original sizing only accounted for typical conditions.
Homes near rivers, lakes, or in areas with naturally high water tables face a more persistent version of this problem, since groundwater pressure can stay elevated for weeks after a storm passes. In these cases, a battery backup pump and a properly sized basin matter more than in drier regions, since pump run time and cycle frequency both increase.
Anyone installing a new sump system should think about worst-case seasonal flow, not the conditions on install day. A basin that looks oversized in July might be exactly right in March.
What Safety Precautions Matter During Sump Basin Installation?
Cutting into a basement slab and excavating soil beneath a home carries a few real risks that go beyond the plumbing itself. Standing water in an existing sump pit or crawl space, especially water that has been sitting for weeks, can carry mold spores, bacteria, or sewage contamination if a floor drain backup has occurred nearby. Wear waterproof gloves and avoid direct skin contact with standing water until you know what you are dealing with.
Concrete dust from slab cutting contains crystalline silica, which is a respiratory hazard with repeated exposure. A basic dust mask is not sufficient for extended cutting work; an N95 respirator rated for silica dust is the minimum for anyone spending more than a few minutes with a saw running.
Mold growth around an existing wet area is common in basements that have had standing water for any length of time. If you notice visible mold on framing, drywall, or insulation near the proposed pit location, address that separately before starting excavation, since disturbing mold-affected material without containment can spread spores through the rest of the basement.
Older homes may also have asbestos-containing floor tile or pipe insulation, particularly in basements built before the 1980s. If the slab area shows old tile adhesive or wrapped pipe insulation nearby, have it tested before cutting rather than assuming it is safe.
The Real Priority Behind Sump Basin Placement
Most homeowner guides treat sump basin placement like a geometry problem: find the low point, cut there, done. That advice is not wrong, but it skips the part that actually determines whether the system works. The lowest visible spot on a basement floor and the point where your drain tile actually terminates are not always the same place, and confusing the two is the single most common reason new installations underperform.
The conventional wisdom also underweights sizing relative to placement. A perfectly located basin that is too small will short cycle itself into an early pump failure regardless of where it sits. Get the basin big enough for your soil and drainage conditions first, then worry about the exact inch of placement within that confirmed low zone.
If there is one thing worth doing before any concrete gets cut, it is tracing the actual drain route rather than trusting where water happens to pool on a rainy day. That single verification step prevents more callbacks than any amount of careful excavation work afterward. Everything else, the gravel bed, the filter fabric, the check valve height, matters far less if the basin sits in the wrong spot to begin with.
— Kayle
Get a Professional Assessment Before You Cut Slab
A professional company offering sump pump installation and waterproofing inspections across the region can help ensure the placement verification discussed in this article is accurate and reliable. Instead of tracing drain tile with a hose and a flashlight, a technician confirms the actual route, checks for buried utilities and structural constraints, and hands you a written plan before anyone touches concrete.

A typical service visit covers a full inspection of existing drainage, a trace of where water is actually entering and traveling through the foundation, and a written estimate that spells out basin size, discharge routing, and installation cost before work starts. If an existing basin is already causing short cycling or sits in a spot nobody can service, that gets flagged during the same visit rather than becoming a second call later.
Request a free inspection through Foundation RESQ’s services page to get a drain trace and installation plan specific to your home’s soil and drainage conditions.
Sources
The technical placement, sizing, and cover guidance in this article draws on the Building America Solution Center, a Department of Energy resource covering foundation drainage and sump installation standards for residential builders. Basin sizing and valve accessibility guidance came from an ASPE technical presentation on sump pumps and controls. Liner sizing and material comparisons referenced SumpPumpCentral’s guide to sump pit liners, and installation sequencing followed DG Floors’ sump pump pit guide.
- Drain or Sump Pump Installed in Basements or Crawlspaces | Building America Solution Center
- ASPE presentation: Sump pumps, sewage ejectors, and controls (Park USA/ASPE)
- Sump Pit Liners: Do You Need One? Types & Sizing — SumpPumpCentral
- Sump Pump Pit (Basin): Complete Guide — DGFloors
FAQ
Should a Sump Basin Be Perforated or Solid?
Choose a perforated basin when drain tile or surrounding gravel feeds water into the pit from multiple directions, which is the standard setup for most residential foundation drainage. A solid liner fits better when the basin only receives piped inflow or when sediment control and radon sealing matter more than broad water collection.
How Deep Should a Sump Basin Be?
Most residential sump basins run 24 to 30 inches deep, with technical guidance setting a minimum of 24 inches for proper pump submersion and float clearance. Homes with higher groundwater or dual pump setups sometimes go deeper to add usable capacity between pump cycles.
How Far Should a Sump Pump Discharge Be From the House?
Discharge lines should route far enough away that water cannot pool back against the foundation or flow onto a neighboring property. Shorter, more direct discharge runs also reduce the total dynamic head the pump has to overcome, letting a smaller pump handle the same job.
Should a Sump Pump Sit on the Bottom of the Pit?
No, a sump pump should sit slightly elevated off the bottom, either on a small paver or built-in stand, to keep the intake clear of settling sediment and debris. Placing it directly on bare gravel or a dirt bottom increases the chance of clogging the intake screen and shortening pump life.
Can Foundation RESQ Help Determine the Best Sump Basin Location?
Yes, Foundation RESQ’s inspection process traces the actual drain route, checks for buried utilities and structural constraints, and provides a written installation plan before any excavation begins. That verification step is exactly what prevents the placement mistakes described throughout this guide, and it starts with a request through the services page.