
Yes, most surface-level concrete crumbling is repairable — but only if you identify the cause before you touch a trowel. Patching a symptom while the root problem keeps running is one of the most common and expensive mistakes homeowners make. ACI 364.1R-19 is direct on this point: effective repair is unlikely when the underlying cause goes unaddressed.
Here are the three things to do right now:
- Stabilize the hazard. If loose chunks are overhead or near foot traffic, cordon off the area. A falling piece of spalled concrete can cause serious injury.
- Document with photos. Photograph every affected area before you disturb anything. Include a ruler or coin for scale. These images are useful for a contractor bid and for insurance.
- Remove loose material only if it is safe. Brush away surface debris by hand. Do not chisel or grind until you have assessed depth and bond.
DIY vs. pro in one rule: Handle it yourself when the damage is shallow surface paste loss that does not expose rebar and does not change slab elevation. Call a professional when the depth exceeds roughly 1/4 inch and exposes aggregate, when you see rebar, when water is actively seeping through, when the slab has shifted, or when the deterioration is spreading fast.
Key Takeaways
Diagnosing the root cause before patching is the single most important step in any concrete repair, because a patch applied over an active problem will fail within one season.
| Point | Details |
|---|---|
| Diagnose before you patch | Identify the cause (freeze–thaw, salts, poor curing, rebar corrosion) before selecting any repair material. |
| DIY threshold is 1/4 inch | Surface paste loss shallower than roughly 1/4 inch with no rebar exposure and no slab movement is safe to patch yourself. |
| Sealer is not optional | Apply a penetrating silane or siloxane sealer after every repair and reapply every 3–5 years on exposed slabs. |
| Limit deicing salts | Avoid calcium chloride and magnesium chloride on concrete, especially in the first year after placement or repair. |
| Call a pro for rebar or movement | Rebar exposure, progressive delamination, or slab settlement require professional assessment, not a patch kit. |
| Foundationresq for complex repairs | Foundationresq provides diagnosis-first inspections, written repair scopes, and concrete repair services for damage beyond DIY range. |
Table of Contents
- Why is your concrete crumbling in the first place?
- How to inspect and diagnose the damage yourself
- What are your repair options, and which ones can you DIY?
- How do you prevent concrete from crumbling again?
- What does a repair actually cost, and how long will it last?
- When should you stop DIYing and call a professional?
- What does the research actually say about why concrete fails?
- Foundationresq can diagnose and repair what a patch kit cannot
- Sources
- FAQ
Why is your concrete crumbling in the first place?
Concrete deterioration rarely has a single cause. The same flaking surface can come from five different mechanisms, and each one points to a different fix. Matching the visual clue to the likely cause is the fastest way to avoid wasting money on a repair that fails in the next freeze.
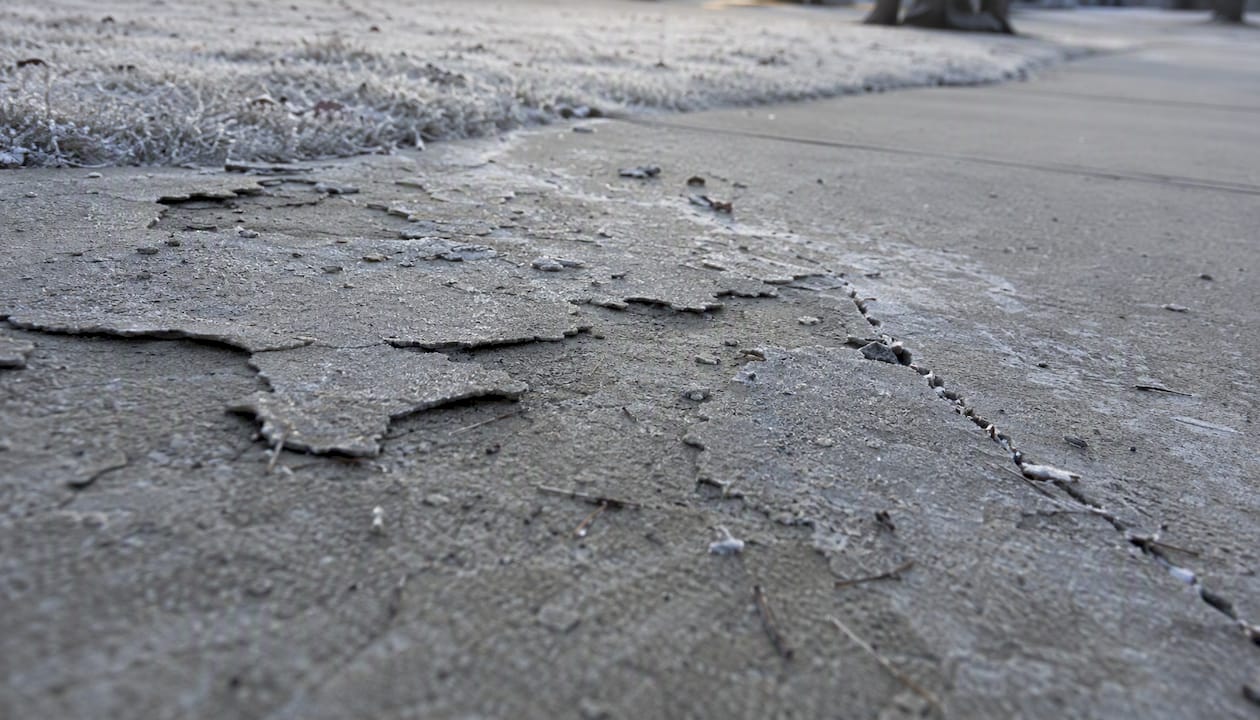
Freeze–thaw scaling
The surface looks like it is peeling in thin sheets, often after the first winter or after several years of repeated cold. Water trapped in the paste expands when it freezes, and if the concrete lacks a proper air-void system, the paste fractures from the inside out. The FHWA tech brief on concrete paving durability identifies insufficient air entrainment as one of the primary drivers of this type of surface distress.
High water-to-cement ratio and overwatering
Excess water weakens the paste and leaves behind a porous, soft surface layer. You will see dusting or powdering under foot traffic, and the surface feels chalky. Adding water to a mix on-site to make it easier to pour is a common job-site shortcut that causes this.
Premature finishing and trowel burn
Finishing the surface before bleed water has fully evaporated traps moisture just below the top layer. The result is a thin, weak skin that delaminates in sheets. It often looks like freeze–thaw scaling but appears on interior slabs or in climates too warm for freeze–thaw to be the culprit.
Deicing salt chemical attack
Calcium chloride and magnesium chloride do more than melt ice. They can form expansive compounds within the cement paste, causing internal pressure and crumbling even without a freeze cycle. The visual signature is clean aggregate left behind after the paste erodes away. If you have been salting a driveway or sidewalk heavily for several winters, this is the first mechanism to suspect.
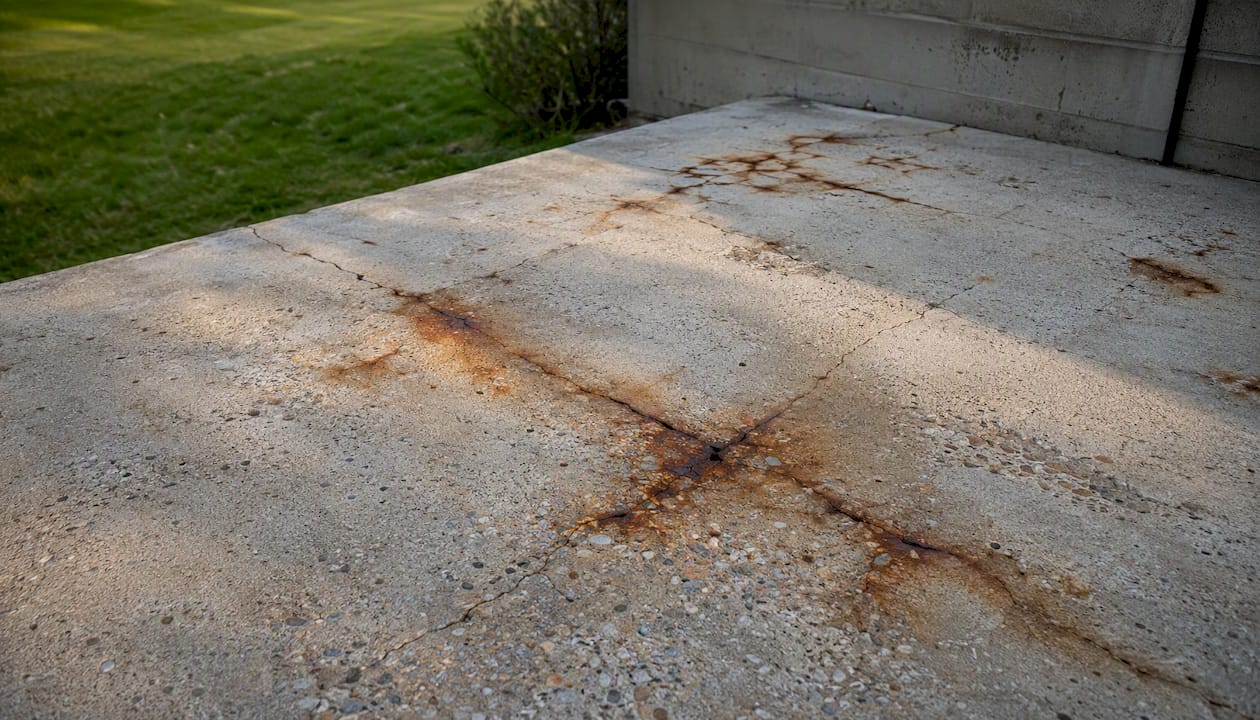
Corrosion-driven spalling and delamination
Rust staining on the surface, combined with rectangular or map-cracking patterns, points to corroding rebar. As the steel rusts, it expands and pushes the concrete cover off. This is a structural concern, not a cosmetic one.
Porous aggregate popouts
Cone-shaped holes with a broken piece of aggregate at the bottom are a giveaway. Certain aggregates absorb water, freeze, and fracture, pulling the surrounding paste with them. These are usually scattered rather than uniform.
Abrasion and erosion
High foot traffic, vehicle tires, or water flow across a soft surface gradually wears the paste away. The surface looks polished or sandblasted, not flaked.
Poor curing or late-season placement
Concrete placed in cold weather without protection, or left to dry too fast in heat and wind, never reaches its design strength. The surface is soft and dusts easily.
Pro Tip: Season and recent history are your fastest diagnostic shortcuts. Damage that appeared after the first hard freeze points to freeze–thaw or salt attack. Damage on a slab poured in late fall or early spring often traces back to poor curing. Heavy vehicle traffic added recently? Abrasion is likely. Run through this timeline before you buy any repair product.
How to inspect and diagnose the damage yourself
A 20-minute inspection with basic tools gives you enough information to decide whether to patch it yourself or call a pro. It also gives a contractor something concrete to work from, which leads to more accurate bids.
Tools you need
Hammer, flathead screwdriver or chisel, paint scraper, tape measure, permanent marker, smartphone camera, and a magnet. The magnet helps locate rebar indirectly by detecting the steel through the cover. A simple moisture check is visual: look for efflorescence (white salt deposits), damp spots, or standing water nearby.
The inspection sequence
Start with a safety check. Look up. If there is any overhead concrete, check for hanging pieces before you walk underneath. Then work through these steps:
- Map the affected area. Walk the full slab and mark the boundaries of visible damage with chalk or tape. Note whether it is concentrated near joints, edges, or drains.
- Sounding test. Tap the surface firmly with a hammer in a grid pattern. A solid surface sounds dense. A hollow or drum-like sound means the layer beneath has delaminated and lost bond. Mark every hollow spot. This is the same nondestructive test method described in condition assessment guidance for concrete structures.
- Probe test. Push a flathead screwdriver or chisel into the damaged area with moderate hand pressure. If it penetrates easily past 1/4 inch, the damage is deeper than a surface patch can reliably fix. If it stops at the paste layer and the underlying aggregate feels solid, a surface repair is viable.
- Measure depth. Use the screwdriver as a depth gauge. Mark the deepest spots on your map.
- Check for rebar. Run the magnet slowly over spalled areas. A strong pull indicates rebar is close to the surface or already exposed. Exposed rebar is an automatic “call a pro” flag.
- Note drainage and nearby sources. Is water pooling near the slab? Are downspouts discharging close by? Is there a road or driveway where salt runoff could reach the slab?
Symptom-to-cause diagnostic reference
| Symptom | Likely cause | Simple probe test result |
|---|---|---|
| Powdery dusting under foot traffic | High w/c ratio or premature finishing | Chisel finds loose paste only; aggregate below is solid |
| Thin sheets peeling after winter | Freeze–thaw scaling or salt attack | Shallow delamination; hollow sound on sounding test |
| Cone-shaped holes with broken aggregate | Porous/reactive aggregate popouts | Isolated pits; surrounding concrete is sound |
| Rust staining with rectangular cracks | Rebar corrosion driving spalling | Probe hits steel; magnet pulls strongly |
| Uniform surface wear, polished look | Abrasion/erosion | Surface is hard but thin; no hollow sound |
| Delaminating sheets on interior slab | Trowel burn / trapped bleed water | Hollow sound; thin skin lifts cleanly |
Red flags that require immediate professional attention: any rebar exposure, large delaminated areas (bigger than a dinner plate), a slab that has shifted or tilted, or damage that has visibly worsened over a single season.
What are your repair options, and which ones can you DIY?
The repair that lasts is the one matched to the cause and the substrate condition. ACI 546 frames this clearly: material selection must account for compatibility in stiffness and shrinkage, not just appearance. A patch that is stiffer or shrinks more than the parent concrete will debond at the edges within a season or two.
When a DIY patch will hold
A surface patch works when the substrate is sound (no hollow spots beyond the immediate repair area), the damage is shallower than about 3/8 inch, rebar is not involved, and the slab is not moving. If all four conditions are met, a polymer-modified repair mortar applied correctly will typically outlast a plain cement patch by years.
Step-by-step DIY patch procedure
- Remove all loose material. Use a hammer and chisel or an angle grinder with a diamond cup wheel to cut back to sound concrete. Feathered edges fail; aim for a square or slightly undercut edge at least 1/4 inch deep.
- Clean the surface. Wire-brush the repair area, then blow or vacuum out all dust. Any contamination under the patch breaks the bond.
- Dry the surface. The substrate should be saturated surface dry (SSD): damp but with no standing water. A bone-dry surface pulls moisture from the patch too fast; a wet surface dilutes the bonding agent.
- Apply a bonding agent. Brush a polymer bonding primer onto the prepared surface and let it become tacky per the manufacturer’s instructions. Skipping this step is the single most common reason DIY patches fail within a year.
- Mix and apply polymer-modified repair mortar. Follow the bag instructions exactly. Do not add extra water. Apply in layers no thicker than the product specifies, typically 1/2 inch per lift. Tamp and consolidate to eliminate voids.
- Finish to match the surrounding surface. A broom finish on a broom-finished slab, a trowel finish on a trowel-finished one. Matching texture reduces the visual contrast and helps the patch blend mechanically.
- Cure the patch. Cover with plastic sheeting or a damp burlap for at least 24 hours; 72 hours is better. Do not let the patch dry out in the first week.
- Seal the repair. Once cured (minimum 7 days), apply a penetrating silane or siloxane sealer over the patch and the surrounding area. This is the step most homeowners skip, and it is the one that determines whether the patch survives the next wet season.
Standard repair tools and materials: polymer-modified repair mortar (pre-bagged), bonding primer, mixing bucket and paddle, margin trowel, angle grinder or wire brush, safety glasses, gloves, plastic sheeting, and a penetrating silane/siloxane sealer. The Marshalltown repair guidance covers tool selection and finishing technique in practical detail.
Do NOT attempt DIY if: rebar is exposed, delamination extends beyond the immediate repair area, the slab is actively settling or has shifted, or the damaged zone is deeper than roughly 1/4–3/8 inch across a wide area. Those situations need a professional assessment.
Pro Tip: Material compatibility is not optional. A patch mortar with a higher modulus of elasticity than the parent concrete will crack at the bond line as the slab flexes. Read the product data sheet and match stiffness class to the existing mix. When in doubt, ask the supplier for a repair mortar rated for exterior flatwork with freeze–thaw exposure.
How do you prevent concrete from crumbling again?
Prevention is mostly about decisions made at the time of placement, but there are meaningful steps you can take on existing slabs too.
For new concrete or replacement work, ask your contractor for these specifics:
- Water-to-cementite materials ratio (w/cm) of 0.45 or lower. The CP Tech Center guidance recommends targeting 0.42 for exterior flatwork exposed to freeze–thaw and deicers.
- Air entrainment of 4–7% for freeze–thaw climates, per ACI guidelines. Air-entrained concrete has a microscopic void system that relieves the internal pressure of freezing water.
- Finishing after bleed water is gone. Closing the surface while bleed water is still rising traps it and creates the weak skin that peels.
- Minimum 7-day moist cure or a high-quality curing compound applied immediately after finishing. Curing is not optional; it is what turns a placed mix into durable concrete.
- Supplementary cementitious materials (SCMs) such as fly ash or slag can improve deicer resistance in exterior flatwork, though the CP Tech Center notes that high SCM content on hand-placed concrete requires careful finishing timing.
For existing slabs:
- Improve drainage so water does not pond on or against the slab. A 1/8-inch-per-foot slope away from structures is the standard target.
- Avoid calcium chloride and magnesium chloride deicers on concrete less than one year old, and minimize their use on any concrete. Sand provides traction without chemical attack.
- Apply a penetrating silane or siloxane sealer every 3–5 years on exterior slabs. These sealers penetrate the paste and reduce water absorption without forming a surface film that can peel.
- Fix downspout discharge and grading issues before they saturate the subbase. Saturated subbase leads to settlement, and settlement leads to cracking that no surface patch can fix.
Pro Tip: Apply penetrating sealer on a dry day when the surface temperature is between 50°F and 90°F. The concrete must be clean and dry, not freshly washed. A second coat applied within an hour of the first, while the first is still absorbing, gives noticeably better penetration depth than a single heavy coat.
What does a repair actually cost, and how long will it last?
Set your expectations before you buy materials or call a contractor. Repair longevity depends almost entirely on whether the root cause was fixed, not on the brand of mortar used.
Typical curing and strength timeline:
- 24–48 hours: light foot traffic on a polymer-modified patch
- 7 days: majority of strength gain; vehicle traffic on most repair mortars
- 28 days: near-full maturity; monitor through the first winter if freeze–thaw exposure is a factor
Ballpark cost ranges:
- DIY patch kit for a small area (under 5 sq. ft.): $15–$50 in materials, plus sealer
- Contractor surface patch or resurfacing overlay: varies widely by region, area, and substrate prep required; depth of damage, access, and whether rebar repair is needed are the main cost drivers
- Partial or full slab replacement: significantly higher, driven by demolition, disposal, subbase repair, and forming costs
These ranges shift based on your region, the contractor’s mobilization costs, and how much substrate prep the job requires. A slab with extensive delamination or corroded rebar costs far more to repair correctly than a simple surface patch. If the repair scope is large and the cost feels steep, financing options can spread the expense without delaying a necessary fix.
Monitoring after repair:
- Photograph repaired areas and note the date.
- Recheck after the first heavy freeze–thaw cycle or first wet season.
- Mark repair boundaries with a permanent marker on the underside of a nearby edge so you can see if the patch boundary is growing.
Pro Tip: Early recurrence after a patch almost always points to a missed root cause. If a patch debonds or cracks within one season, look at drainage, subbase condition, and salt exposure before repatching. Repeating the same repair without fixing the cause is a cycle that ends in full replacement.
When should you stop DIYing and call a professional?
Some concrete problems look like surface issues but are not. Knowing the threshold saves you from a repair that masks a structural problem until it becomes a much larger one.
Call a contractor or structural engineer when you see any of these:
- Rebar exposure anywhere on the slab
- Multiple deep spalls (deeper than 3/8 inch) across more than 30–40% of the surface
- Progressive delamination that is spreading between inspections
- Slab movement, settlement, or tilt
- Cracking patterns that suggest subbase failure (wide, irregular cracks following the slab perimeter or running to joints)
- Popouts concentrated near joints or across a large area
- Widespread scaling over large sections of the surface
What a professional inspection delivers:
- Full visual survey with a scaled site map and photo record
- Sounding and delamination mapping across the entire affected area
- Core sampling or petrographic analysis when the cause is unclear
- Chloride profiling if deicer attack is suspected
- Half-cell corrosion potential testing or cover-depth measurement if rebar corrosion is a concern
- Structural analysis if load-bearing elements are affected
- Written repair scope with material specifications and warranty terms
Before the visit, prepare:
- Photos with a scale reference (ruler or coin in frame)
- A rough sketch or map of affected areas
- History of deicing use, recent pours, heavy vehicle traffic, and any prior repairs
- Notes on when the damage first appeared and how fast it has progressed
Pro Tip: Ask any contractor for a diagnosis-first repair plan that references ACI guidance and includes material compatibility notes. A bid that skips the diagnostic step and goes straight to a price is a red flag. You want a written scope that explains why a specific repair method was chosen, not just what it costs.
For homeowners dealing with foundation issues alongside surface deterioration, getting both assessed in the same visit is worth requesting.
What does the research actually say about why concrete fails?
The practical advice in this article is grounded in a consistent body of industry guidance. Here is what the evidence says, translated for homeowners.
The diagnosis-first principle has a strong technical basis
ACI Committee 364 states that condition assessment procedures should combine document review, visual surveys, nondestructive testing, sampling, and laboratory analysis before a repair method is selected. Patching a surface when the subbase is failing or drainage is wrong causes the repair to fail prematurely, often within a single season. This is not a theoretical concern; it is the most common reason DIY patches fail.
Freeze–thaw damage is more complex than it looks
Freeze–thaw damage in concrete is not a single mechanism. Laboratory and field evidence shows that repeated saturation and freezing, combined with deicing salts and external loading, create coupled physical and chemical processes that amplify paste loss far beyond what any single factor would cause alone. Air entrainment, supplementary cementitious materials, fiber reinforcement, and penetrating sealers each address a different part of this coupled system.
A peer-reviewed review of freeze–thaw effects on concrete pavement confirms that mitigation requires addressing multiple factors simultaneously. Air entrainment alone is not sufficient when deicers are present; sealers reduce water absorption, and SCMs improve paste density. The FHWA tech brief adds that finishing practice and w/cm control are equally important upstream of any sealer application.
Material compatibility is the most overlooked repair variable
ACI 546 defines the key failure modes (disintegration, scaling, spalling, delamination) and is explicit that repair materials must be selected for compatibility with the parent concrete in terms of stiffness, shrinkage, and thermal expansion. A patch that is mechanically mismatched will debond at the interface regardless of surface preparation quality.
The CP Tech Center’s 2023 brief on concrete scaling reinforces this: repair options are limited and must match the failure mechanism. There is no universal patch product.
Pro Tip: When symptoms do not match any common cause, request core sampling and petrographic analysis. A petrographic exam of a concrete core answers questions that no surface inspection can: aggregate reactivity, chloride penetration depth, air-void system quality, and whether the paste was ever properly hydrated. It is the difference between guessing and knowing.
The mistake most homeowners make before calling anyone
Most homeowners who end up calling a professional have already patched the same spot once or twice. The patch looked fine for a few months, then cracked at the edges or lifted entirely. When we ask what happened, the answer is almost always the same: they bought a bag of repair mortar, pressed it into the hole, and called it done. No bonding agent. No curing. No sealer. And no investigation into why the concrete failed in the first place.
The diagnosis-first approach is not a formality. It is what separates a repair that lasts five years from one that lasts five months. Drainage problems, salt exposure, and subbase settlement do not stop because you covered them with mortar. They keep working, and the patch is the first thing to show it.
The other pattern worth naming: homeowners who wait too long. A small patch of surface scaling that gets ignored through one more winter becomes a delamination problem. A delamination problem that gets ignored becomes rebar exposure. Each stage is more expensive than the one before it. Documenting damage and checking it annually is not overcautious; it is the cheapest form of concrete maintenance there is.
Foundationresq can diagnose and repair what a patch kit cannot
When the damage goes deeper than a DIY fix, you need a team that starts with a diagnosis, not a price. Foundationresq inspects concrete surfaces, maps delamination and spalling, identifies root causes, and delivers a written repair scope before any work begins. That means no guessing about what caused the problem, and no repair that fails because the underlying issue was ignored.
A Foundationresq inspection covers the full site: photo documentation, sounding and depth mapping, drainage and subbase assessment, and a written estimate with material specifications. For homeowners dealing with moisture-related deterioration, the team also evaluates crawl space waterproofing and basement waterproofing services that address the water source driving surface damage. Financing is available for larger repairs. Schedule your inspection and get a clear picture of what your concrete actually needs.
Sources
These sources back the guidance in this article and are worth bookmarking if you want deeper technical context.
- FHWA: Ensuring Durability of Concrete Paving Mixtures – Part I
- Impact of Freeze–Thaw Cycles on the Long-Term Performance of Concrete Pavement (Review)
- Evaluation and Repair of Concrete Structures (PDH Online summary/manual)
FAQ
Can crumbling concrete be repaired?
Yes. Shallow surface crumbling (scaling, dusting, light spalling shallower than roughly 1/4 inch) is repairable with a polymer-modified repair mortar when the substrate is sound and the root cause is addressed first. Deeper damage involving rebar or slab movement requires professional repair.
Why is my concrete disintegrating?
The most common causes are freeze–thaw cycling, deicing salt chemical attack, a high water-to-cement ratio in the original mix, and premature finishing that trapped bleed water near the surface. The FHWA tech brief identifies these as the primary drivers of surface distress in concrete flatwork.
How do you stabilize crumbling concrete?
Remove all loose material back to sound concrete, apply a polymer bonding primer, and fill with a polymer-modified repair mortar. Cure for at least 24–72 hours under plastic sheeting, then seal with a penetrating silane or siloxane sealer once the patch has cured for 7 days.
Can you pour concrete over crumbling concrete?
Not directly. Pouring over unsound material creates a bond-line failure. The deteriorated layer must be removed to sound concrete first. A thin bonded overlay (typically 1/4–3/4 inch) applied over a properly prepared, sound substrate can work, but it requires a bonding agent and is only appropriate when the underlying concrete is structurally intact.
Recommended
- Why Basement Floor Cracks Appear: A Homeowner’s Guide – Tallahassee Foundation Repair | Foundation ResQ
- Fixing Stair-Step Brick Cracks: Tallahassee Guide 2026
- Beyond the Cracks: Expert Concrete Lifting and Repair Solutions – Tallahassee Foundation Repair | Foundation ResQ
- Who to Call When Your Foundation Cracks: Expert Contractors – Tallahassee Foundation Repair | Foundation ResQ