
That chalky white residue crusting your basement wall is almost always basement wall efflorescence, mineral salts left behind after water moved through the masonry and evaporated. The powder itself is harmless. What matters is why it showed up: run a brush test and a plastic sheet test, then check your gutters and grading after the next rain to find out if water is still getting in.
TL;DR:
- A single dry, flaky patch of efflorescence usually results from construction curing or an isolated wet event and doesn’t require urgent action.
- Recurring deposits, especially alongside signs like peeling paint or rust stains, indicate an active moisture problem that can cause long-term damage if left unaddressed.
- Conduct simple tests such as brushing off the powder, applying a plastic sheet, or using a moisture meter to determine if moisture is still penetrating the wall.
- Improving exterior drainage by regrading the soil, extending downspouts, and cleaning gutters represents the most cost-effective solution to stop moisture infiltration.
- Professional waterproofing solutions, including exterior membrane sealing and interior drainage systems, are necessary if drainage fixes alone do not prevent efflorescence from returning.
Table of Contents
- What Causes Efflorescence on Basement Walls
- How to Tell if Basement Efflorescence Is Still Active
- When Efflorescence Is Cosmetic vs. a Warning Sign
- Safely Removing Efflorescence Before You Fix the Source
- Permanent Ways to Stop Efflorescence From Coming Back
- When to Call a Waterproofing or Foundation Professional
- What Homeowners Get Wrong About Efflorescence
- How Foundation RESQ Fixes the Water, Not Just the Powder
- Sources
- FAQ
What Causes Efflorescence on Basement Walls
Efflorescence looks like a dusting of flour, a chalky bloom, or crusty white streaks that follow mortar joints or crack lines. Unlike mold, it’s dry, powdery, and won’t smear into a greasy stain. Unlike peeling paint, it sits on top of the surface rather than lifting from underneath.
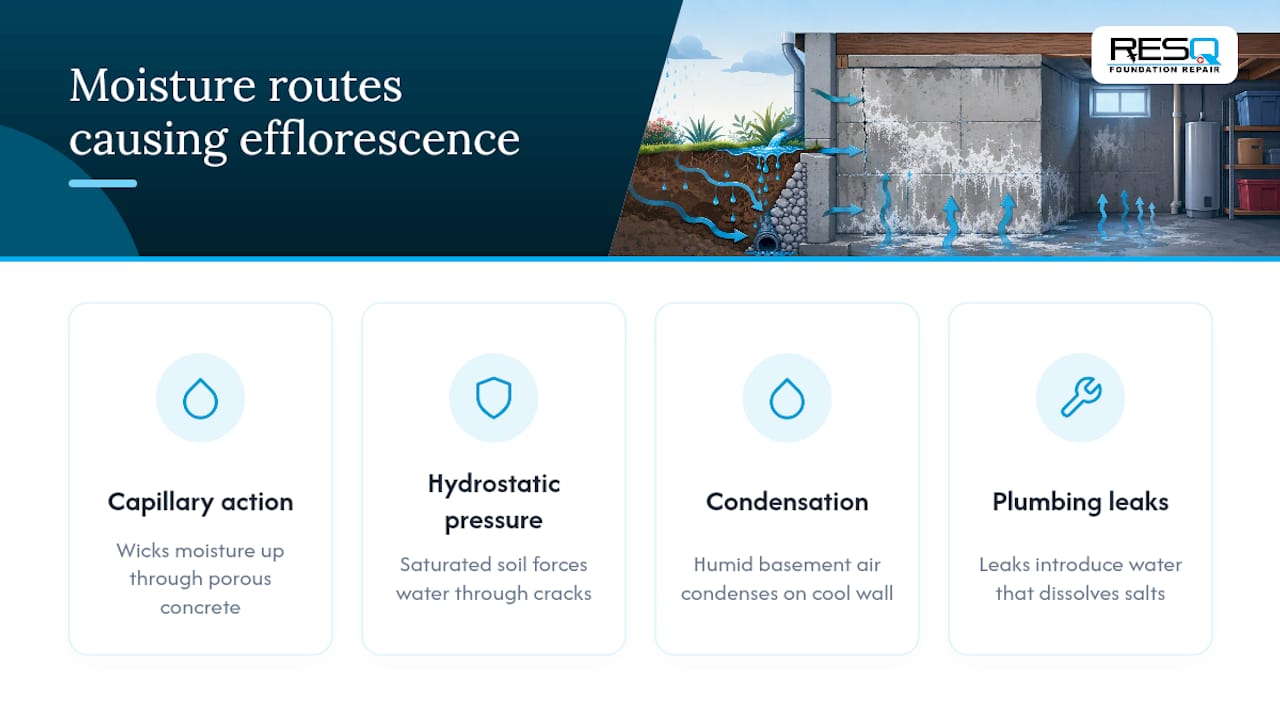
The salts come from somewhere ordinary: minerals baked into the concrete mix, mortar, or the soil pressed against your foundation. Water dissolves those salts, carries them toward the surface, and leaves the crystals behind as it evaporates, according to InterNACHI’s inspector guidance. Three forces usually push that water through your walls: capillary action wicking moisture up through porous concrete, hydrostatic pressure from saturated soil forcing water through cracks and pores, and simple condensation when humid basement air meets a cool wall. Add plumbing leaks to that list, and you’ve covered nearly every basement case.
How to Tell if Basement Efflorescence Is Still Active
Three cheap tests tell you whether you’re looking at an old, dry deposit or a live moisture problem.
- Brush test: Rub the powder with a dry brush or gloved hand. If it flakes off easily and the wall underneath feels dry, that’s a good early sign, though it doesn’t rule out moisture returning later.
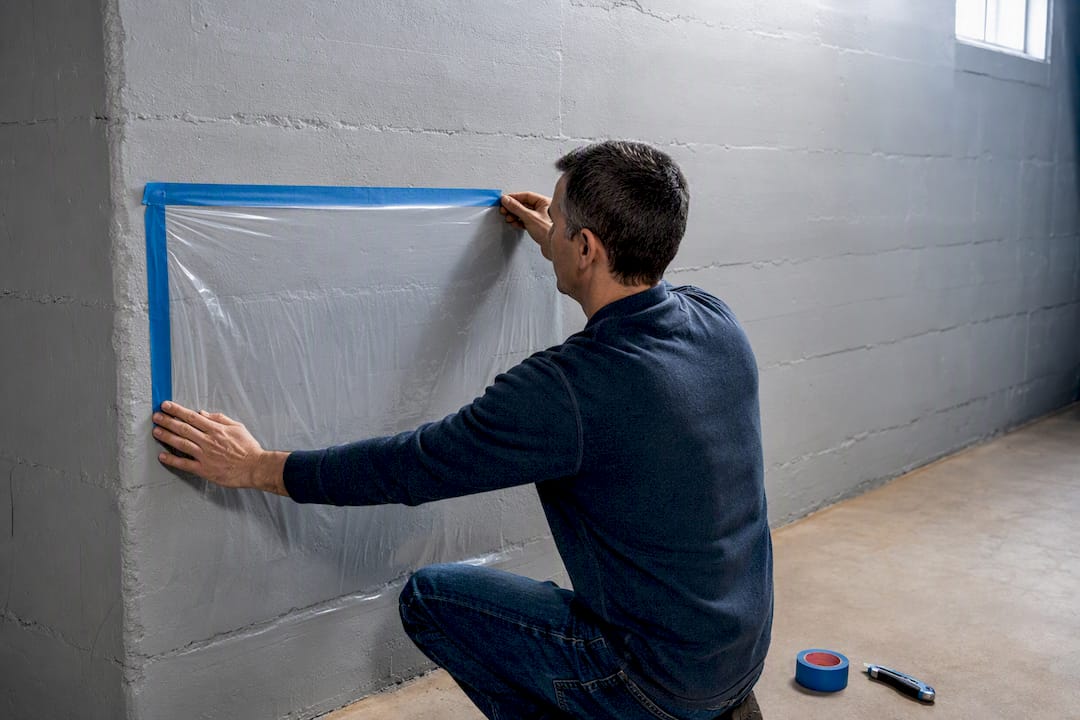
- Plastic sheet test: Tape a clear plastic sheet or foil square over a clean patch of wall, sealing all four edges, and leave it 24 to 48 hours. Condensation forming underneath the sheet points to moisture moving through the wall itself, not just humid room air.
- Moisture meter: A pin or pinless moisture meter gives you a number instead of a guess, and it’s worth the twenty dollars if you’re dealing with a finished basement.
- Timing: Note whether new powder appears within a day or two of heavy rain or a humid stretch. Recurrence tied to weather is the clearest signal you have an active water source, per InspectAPedia’s testing guidance.
Photograph each test with the date visible, and mark the spot on the wall with a pencil so you’re comparing the same patch every time.
Pro Tip: Run the plastic sheet test in two spots at once, one near a corner and one mid-wall. Corners and cove joints (where wall meets floor) tend to show hydrostatic pressure first.
When Efflorescence Is Cosmetic vs. a Warning Sign
A single, dry, flaky patch that never comes back after cleaning is usually a leftover from construction curing or one isolated wet event. That’s cosmetic, and monitoring is a reasonable next step.
Recurring deposits are a different story. Watch for these red flags:
- Powder returns within weeks of cleaning it off
- Paint or sealant is bubbling, peeling, or blistering near the deposit
- The concrete surface itself is flaking or pitting (spalling)
- Rust streaks near cracks, hinting at corroding rebar underneath
- A musty smell or visible dampness alongside the white crust
Left unaddressed, that pattern doesn’t stay cosmetic. Repeated salt crystallization inside concrete pores creates pressure that can flake or spall the surface over time, and the same moisture source that’s feeding the efflorescence is exactly what invites mold growth and, eventually, rebar corrosion. InspectAPedia’s building-damage research treats efflorescence less as a cosmetic nuisance and more as an early warning gauge for a wall’s moisture history.
Safely Removing Efflorescence Before You Fix the Source
You can knock down most deposits yourself in an afternoon, but skip the pressure washer. Forcing water at a masonry wall pushes more moisture into the pores than it removes, and it can make the next round of efflorescence worse.
- Dry brush the wall with a stiff nylon brush, then vacuum the loose powder before it settles into carpet or storage boxes.
- Mix a solution of roughly one part white vinegar to three parts water, scrub the stained area, then rinse with a damp cloth and let it air dry.
- For stubborn, crusted-on salts, some guides recommend diluted muriatic acid, but treat that as a last resort: it requires gloves, eye protection, ventilation, and a neutralizing rinse, and it’s easy to etch or discolor the concrete if you get the ratio wrong, per The Basement Guide’s cleaning breakdown.
- Run a dehumidifier nearby, patch any hairline cracks you spot, and keep boxes and furniture a few inches off the wall while you monitor for recurrence.
Pro Tip: Test any cleaner on a small hidden patch first. Vinegar is safe on cured concrete but can dull certain sealed or painted finishes.
Permanent Ways to Stop Efflorescence From Coming Back
Cleaning the wall treats the symptom. Stopping the water is the only fix that actually holds, and the smartest approach works from the outside in.
Start with the cheapest, least invasive layer: regrading soil so it slopes away from the foundation, extending downspouts at least five to six feet from the wall, and cleaning gutters so roof runoff isn’t dumping straight into the soil beside your basement. NC State’s extension research on gutter management treats this as the first and most cost-effective control, and it’s one interior patches simply can’t replace when the water source is outside.
If drainage fixes alone don’t stop the recurrence, the next layer depends on how the water is getting in:
- Exterior excavation and membrane waterproofing addresses hydrostatic pressure directly, sealing the wall from the outside where the pressure originates.
- Interior perimeter drains paired with a sump pump manage water that’s already breached the wall, redirecting it before it reaches your floor.
- Sub-slab vapor retarders and capillary breaks interrupt the wicking action that pulls ground moisture up through the slab and wall base.
“Design and detailing measures like air-space drainage walls, flashing, and capillary breaks reduce the potential for efflorescence by limiting moisture entry and salt transfer in the first place.” That’s the Brick Industry Association’s technical guidance, and it applies just as much to retrofits as to new construction.
Dehumidification and crawl space or basement encapsulation round out the system, keeping indoor humidity low enough that condensation stops contributing to the problem even after the exterior water is under control. You can dig deeper into what drives recurring basement water problems if you want the mechanics behind why grading and drainage carry so much of the load.
When to Call a Waterproofing or Foundation Professional
If the tests above point to active moisture, or you’re seeing spalling, rust stains, or recurring deposits despite good drainage, it’s time for a proper inspection. A qualified contractor walks the perimeter checking grading, gutter discharge points, and downspout extensions, then moves inside to look for hydrostatic pressure signs, footing drain performance, and any rebar corrosion or spalled concrete.
Before you sign anything, ask a few pointed questions:
- Will you provide a written scope of work, not just a verbal estimate?
- What warranty backs the repair, and for how long?
- Can I see before-and-after photos or references from similar jobs?
- Does the plan address the water source, or just the interior symptoms?
A contractor who jumps straight to selling a sealant without inspecting your grading and downspouts is skipping the diagnostic step that actually matters. Foundation RESQ’s inspections start outside for exactly that reason, tracing the moisture path before recommending perimeter drainage or waterproofing work.
What Homeowners Get Wrong About Efflorescence
Most homeowners treat the powder as the problem. It isn’t. Painting or sealing over active efflorescence just traps moisture behind the coating, and that usually shows up later as blistering paint or a wet spot you can’t explain. Document the deposit, test it, fix the water source first, and clean the salt last. If a professional recommends a big repair before checking your grading and gutters, get a second opinion.
— Kayle
How Foundation RESQ Fixes the Water, Not Just the Powder
Foundation RESQ is a direct alternative to guessing your way through basement efflorescence with cleaning products and hope. Instead of another round of vinegar and a paint job that traps moisture behind it, you get a free inspection that traces the actual water path, from grading and downspouts outside to footing drains and slab moisture inside.

The team handles the full range of fixes this article covers: exterior waterproofing, interior perimeter drains and sump pumps, crawl space encapsulation, and basement dehumidification systems sized to your space. If a bigger structural issue turns up, like spalling concrete or corroded rebar tied to years of unmanaged moisture, that gets flagged in the same visit instead of waiting for a second contractor. Financing options are available for larger jobs, and every repair comes with a written warranty. Schedule a free inspection to find out whether your basement needs a cleaning or a permanent drainage fix, and check the financing guide if cost is the thing holding you back from calling.
Sources
- Efflorescence for Inspectors – InterNACHIAE
- Efflorescence building damage indicators | Inspectapedia
- Efflorescence 3 Causes and Prevention | Brick Industry Association (TN 23A)
- Basement efflorescence: what that white powder really means (The Basement Guide)
- Moisture control and prevention: gutter management (NCSU)
If moisture problems are affecting a home you’re planning to sell, this guide on disclosing foundation issues covers what buyers and inspectors typically expect to see documented.
FAQ
How can I fix efflorescence on basement walls?
Clean the deposit with a dry brush and a vinegar rinse, then fix the moisture source causing it, usually by improving grading, extending downspouts, or adding perimeter drainage. Cleaning without addressing the water only buys you a few weeks before it returns.
Is efflorescence on basement walls bad?
The salt itself isn’t harmful, but it’s a reliable sign that water is or was moving through your wall, and recurring deposits alongside spalling, rust stains, or paint blistering point to a real moisture problem worth fixing.
Can you paint over efflorescence?
Painting or sealing over active efflorescence traps moisture behind the coating, which usually leads to peeling, blistering, or a worse-looking wall within a season. Clean the deposit and confirm the wall is dry before applying any coating.
Can efflorescence be removed permanently?
Yes, but only by stopping the water source, not by cleaning alone. Once grading, drainage, or waterproofing corrects the moisture path, new salt deposits stop forming because there’s no water left to carry them to the surface.