
Water in a crawl space usually points to runoff, drainage problems, a plumbing leak, or another source that needs attention. To understand how to deal with a flooded crawl space, first stay out until hazards such as standing water near electrical equipment, exposed wiring, or sewage have been assessed. Then address the source, remove the water safely, and dry the affected area.
It’s natural to focus on getting the water out, but drying the space and preventing water from returning matter just as much. Avoid touching electrical equipment if you’re standing in water or the equipment is wet.
This guide covers common causes of crawl space flooding, practical steps to take when you find water, and signs that call for professional help. You’ll also learn how drainage improvements, sump pump systems, and crawl space moisture control can help protect your Tallahassee home over time.
Key Takeaways
- Trace the water to its source, such as runoff, plumbing leaks, or HVAC condensation, before choosing a lasting fix.
- Prioritize safety around standing water, then match water removal to the amount present and dry wet materials thoroughly.
- Reduce moisture returning by directing downspouts 4-6 feet from the foundation and maintaining crawl space humidity between 30% and 50%.
- Learn how sump pumps, backup power, and vapor barriers can help protect the crawl space from recurring water problems.
- Know when persistent moisture, contaminated water, mold, or signs of structural damage call for professional assessment.
How to Prevent Crawl Space Flooding in the Future?
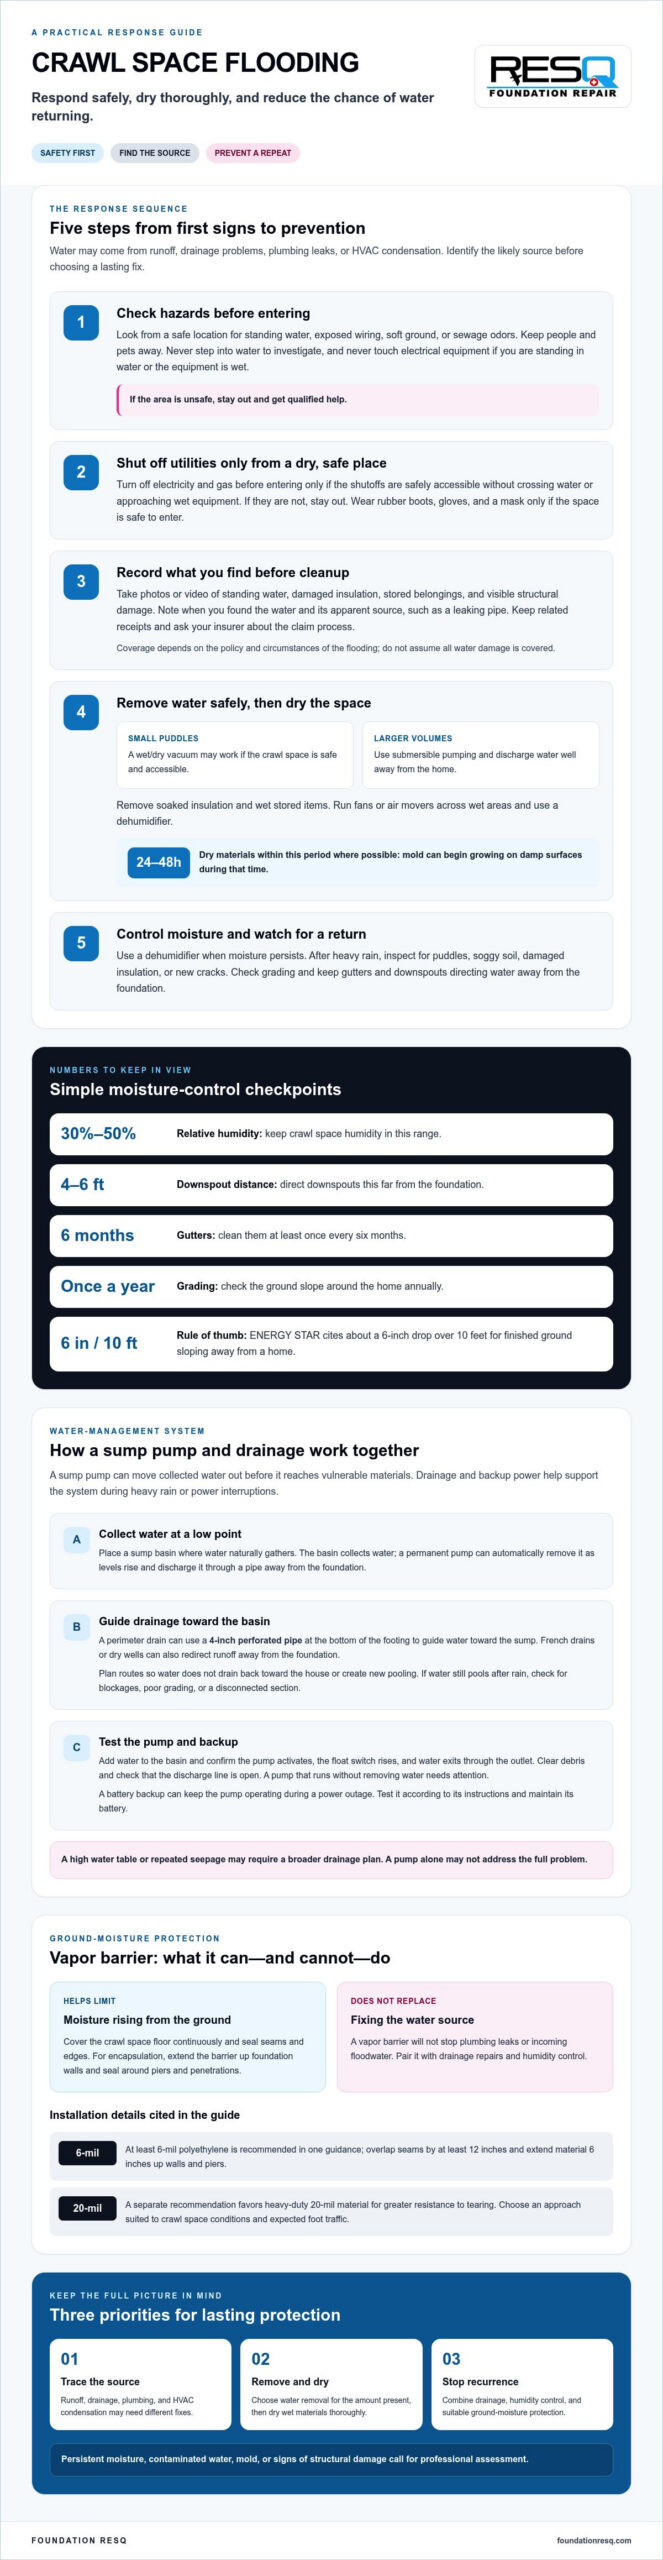
1. Start by identifying the water and protecting yourself. Before entering, look from a safe location for standing water, exposed wiring, soft ground, or sewage odors. If you find water, keep people and pets away, and don’t step into it to investigate. Record where the water appears to enter, whether it is pooled or flowing, and whether nearby floors feel uneven. These observations can help distinguish recurring runoff from a plumbing or drainage problem.
2. Shut off utilities only from a dry, safe location. Turn off electricity and gas before entering a flooded crawl space, if you can reach the shutoffs without crossing water or approaching wet equipment. Never touch electrical equipment while standing in water or if the equipment is wet. If the shutoff isn’t safely accessible, stay out and get qualified help. Wear rubber boots, gloves, and a mask if the area is safe to enter.
3. Document the damage before removing water. Homeowners insurance coverage depends on the policy and the circumstances of the flooding, so don’t assume all water damage is covered. Before cleanup, take photos or video of standing water, damaged insulation, stored belongings, and visible structural damage. Note when you found the water and any apparent source, such as a leaking pipe. Keep related receipts and contact your insurer about the claim process.
4. Remove water safely, then dry the space. Small puddles may be manageable with a wet/dry vacuum if the crawl space is safe and accessible. Larger volumes call for submersible pumping, with water discharged well away from the home. Remove soaked insulation and wet stored items, since trapped moisture can remain against wood and other surfaces. Run fans or air movers across wet areas and use a dehumidifier. Dry materials within 24-48 hours where possible, because mold can begin growing on damp surfaces during that period.
5. Control moisture and prevent repeat flooding. Keep crawl space relative humidity between 30% and 50%, and use a dehumidifier when moisture persists. Inspect after heavy rain for puddles, soggy soil, damaged insulation, or new cracks. Clean gutters at least once every six months, and direct downspouts 4-6 feet away from the foundation, as InterNACHI recommends. Check grading once a year; ENERGY STAR cites about a 6-inch drop over 10 feet as a rule of thumb for finished ground sloping away from a home. A vapor barrier or crawl space encapsulation can help control ground moisture, but neither replaces correcting the water’s source.
Sump pump installation and backup power
A sump pump can move collected water out of a crawl space before it reaches vulnerable materials. Pairing it with drainage and backup power helps create a more reliable system during heavy rain or power interruptions.
-
Install a Sump Pump
Choose a low collection point where water naturally gathers, then install a sump basin and pump there. The basin collects water, and the pump discharges it through a pipe away from the foundation. A permanent sump pump can automatically remove water as levels rise. Plan the discharge route so it won’t drain back toward the house or create new pooling near the structure.
Keep the sump basin accessible for inspection and maintenance. The pump needs to suit the site’s drainage conditions and water inflow. A high water table or repeated seepage may call for a broader drainage plan rather than a pump alone. Keep the outlet clear so water can drain away.
-
Connect Drainage to the Sump Pump
Direct perimeter drainage toward the sump basin to collect water before it spreads across the crawl space floor. A perimeter drain can use a 4-inch perforated pipe at the bottom of the footing. Its placement and slope guide water toward the basin, where the pump can discharge it away from the home.
French drains or dry wells can also redirect runoff away from the foundation. Choose a route that carries water away rather than toward another low point beside the house. Keep the discharge outlet clear and make sure runoff won’t re-enter the drainage system. If water still pools after rain, check the path for blockages, poor grading, or a disconnected section.
-
Maintain the Sump Pump and Backup Power
Check the sump pump regularly by adding water to the basin and confirming that it activates. Watch the float switch as the water rises, then make sure the pump discharges water through its outlet. Clear debris from the basin and check that the discharge line is open. A pump that runs without removing water needs attention before the next storm.
Choose a sump pump with battery backup so it can continue operating during a power outage. Test the backup according to its instructions, and keep its battery maintained. During an outage, confirm the pump can still move water away from the foundation. For site-specific help reviewing drainage routes and moisture control, explore crawl space moisture solutions.
Preventing future flooding with a vapor barrier
A vapor barrier helps limit ground moisture, but it won’t stop plumbing leaks or incoming floodwater. Pair it with drainage repairs and humidity control to better protect the crawl space.
-
Use a Vapor Barrier for Encapsulation
Cover the crawl space floor with a continuous vapor barrier, then seal seams and edges. Guidance recommends at least 6-mil polyethylene, seams overlapping by at least 12 inches, and material extending 6 inches up walls and piers. A separate recommendation favors heavy-duty 20-mil material for greater resistance to tearing. Choose an approach that suits the crawl space’s conditions and expected foot traffic.
For encapsulation, extend the barrier across the floor and up the foundation walls, sealing around piers and penetrations. Check plumbing lines, access points, and visible cracks before covering them. A barrier can limit moisture rising from soil, but it cannot fix active leaks or water entering through foundation openings. Address those sources first, or moisture may remain trapped beneath the liner.
-
Pair Vapor Barriers With Dehumidifiers
Use a dehumidifier with the vapor barrier to manage humidity in an enclosed crawl space. The barrier limits ground moisture, while the dehumidifier removes moisture from the air. Aim to keep relative humidity between 30% and 50%. Place the unit where air can circulate, and keep its filter maintained so dust doesn’t restrict airflow.
Check humidity after rain and during routine inspections. If readings stay high, look for a damaged seam, wet insulation, plumbing leaks, or water at the foundation. A barrier works best alongside dehumidification or proper vents, but ventilation alone won’t fix standing water. Address drainage and leaks before relying on humidity equipment to manage remaining moisture.
- Inspect and repair the barrier twice a year. Look for tears, loose seams, water beneath the liner, and gaps around plumbing or support piers. Replace or reseal damaged sections promptly, then confirm the material still rises along walls and piers. Keep stored items from puncturing the barrier, and avoid dragging tools across it. Record problem areas during each inspection so changes are easier to spot.
A vapor barrier isn’t a substitute for a sump pump or effective drainage when water collects on the floor. If pooling continues, find out whether runoff, a high water table, or a leak is responsible. Correct the source before repairing the liner. This helps protect insulation and structural materials while reducing moisture that can affect indoor air.
What’s Causing Water Problems in Your Crawl Space?
For crawl space water under an inch deep, use a wet/dry vacuum only if the area is safe and accessible. Larger volumes, unsafe conditions, or water that keeps returning call for professional water removal.
- Trace where the water entered before pumping. Check whether the ground is wet near a foundation wall, a plumbing line, or the crawl space access. Rainwater pooling after a storm may point to runoff or poor grading; water near a pipe may indicate a leak. A few inches of rain on a roof can produce thousands of gallons of runoff, so note where downspouts discharge and where water gathers.
- Choose a removal method based on depth and access. Use a wet/dry vacuum for small puddles or water less than an inch deep, provided the area is safe to enter. For significant flooding, submersible pumps can remove large volumes faster. Don’t wade through standing water to reach equipment, and don’t use electrical tools near water or wet wiring.
- Discharge pumped water away from the foundation. Direct the pump hose where water can drain without flowing back toward the home. If the hose empties beside the foundation, rainwater may seep into the crawl space again. Watch the outlet while pumping, and reposition it if water collects near the house or runs toward a low foundation opening.
- Remove the remaining water after pumping. Once the pump has removed deeper water, use a wet/dry vacuum to collect the last inch or two. A floor squeegee can move shallow puddles toward the pump or vacuum pickup point. Work across the crawl space in sections, including low spots behind piers, where water can remain after the central area looks clear.
- Take out soaked insulation and stored items. Wet insulation can hold moisture against floor framing, while cardboard boxes and fabric may stay damp after surface water is gone. Remove waterlogged materials and separate salvageable belongings from items that remain saturated. Most soaked insulation and wet stored items should be discarded and replaced. Check nearby wood for softness, discoloration, or signs of structural damage.
- Dry the crawl space, then check why flooding happened. Use fans or air movers across wet surfaces and dehumidifiers to remove moisture from the air. Aim to dry materials within 24-48 hours, when possible, to limit mold growth. After drying, inspect grading, gutters, downspouts, and plumbing for the source. If puddles return after rain, correct the drainage path instead of repeatedly removing the same water.
When to call a professional
In the United States, crawl space water removal and drying costs depend on the water volume, contamination, drying needs, and damage. A free inspection and estimate can help identify the work required, including whether affected insulation, other materials, or structural repairs need attention.
- Call for an assessment if water remains or returns. A crawl space that stays wet after pumping needs more than surface cleanup. An assessment can identify the water source, drainage issues, and affected materials. This matters when water returns after heavy rain, the sump pump can’t keep up, or the source remains unclear. Repeated pooling can leave moisture around the foundation and damage wood framing.
- Stay out if the space presents a hazard. Don’t enter standing water near exposed wiring, wet electrical equipment, unstable ground, or sewage odors. Keep clear if the access area is unsafe or the water level prevents a safe exit. Get a professional assessment when hazards make inspection difficult. Don’t touch electrical equipment while standing in water or if it’s wet.
- Get qualified cleanup for contaminated water. Sewage or other contaminated water can expose people to health hazards during removal and cleanup. The U.S. Environmental Protection Agency advises calling a professional experienced in cleaning and repairing buildings damaged by contaminated water. Keep people and pets away from the crawl space until cleanup addresses contamination and affected materials.
- Arrange prompt drying when materials are soaked. Mold colonies can begin growing on damp surfaces within 24-48 hours. A professional can assess wet insulation, wood framing, and enclosed areas that fans may not dry effectively. Ask for attention to the moisture source as well as visible water damage. Drying without correcting a plumbing leak or drainage problem leaves the same materials vulnerable to renewed moisture.
- Request a structural inspection for changes in the home. Water can cause beams and joists to warp or rot, contributing to uneven floors or foundation movement. Report new cracks, sagging floors, or doors that suddenly stick, especially after flooding. An assessment can help distinguish moisture damage from other structural concerns and determine whether foundation repair or other corrective work is needed.
- Choose the next step based on the source and damage. A clogged drain, failed sump pump, plumbing leak, and recurring seepage require different remedies. Record where water collected and what changed after rain, then share those observations during an assessment. For help addressing foundation concerns and related damage, request a foundation assessment.
Foundation ResQ: Foundation repair
Foundation ResQ can help when crawl space flooding leaves signs of foundation movement, damaged materials, or mold. New cracks, uneven floors, or recurring water near the foundation call for an assessment that looks beyond standing water. Foundation repair addresses structural concerns, while Mold Remediation Services address mold and the underlying moisture issues. Helical Pier Installation or Push Pier Installation may be suitable when additional foundation support is needed.
Share what you’ve noticed, such as where water collects, whether it returns after rain, and any changes inside the home. These details help connect the moisture problem with potential structural effects. For a next step, contact Foundation ResQ about foundation repair.
Protect the Home Beyond the Cleanup
Knowing how to deal with a flooded crawl space is only part of protecting your home. After cleanup, watch for changes such as new cracks, shifting floors, or persistent moisture. These signs can help you determine whether the problem is limited to damp materials or has affected the structure.
Foundation ResQ offers foundation repair and Mold Remediation Services for homeowners addressing structural concerns or mold related to moisture. If an assessment identifies a need for additional support, Helical Pier Installation may be an appropriate repair option. Request a free inspection and estimate to get a clearer plan for your Tallahassee property.
Share what you observed and where water collected when discussing the next step. Contact Foundation ResQ for help with foundation or mold concerns. A careful response can put you on a steadier path toward protecting your home.
Frequently Asked Questions
How do you identify the source of crawl space flooding, such as plumbing leaks, groundwater, or surface runoff?
Compare where water appears with the weather and household plumbing use. Water that shows up after rain near an exterior wall may point to runoff; damp soil across the floor or seepage through walls may suggest groundwater. Check exposed pipes and drain connections for visible drips or wet joints. Note whether the area stays damp during dry weather. These patterns can help narrow down the cause before repairs begin.
How do you dry and disinfect a flooded crawl space and prevent mold?
Remove standing water and wet debris first, then dry surfaces and materials with airflow and dehumidification. Clean and disinfect suitable hard surfaces according to the product label, and don’t assume porous, soaked materials are salvageable just because their surfaces look clean. If sewage or other contaminated water caused the flooding, the U.S. Environmental Protection Agency advises using a professional experienced in cleaning and repairing contaminated buildings. Knowing how to deal with a flooded crawl space includes addressing contamination safely.
When should wet insulation, vapor barriers, or damaged materials be removed and replaced?
Remove insulation that is soaked, compressed, or still damp after drying; wet insulation can retain moisture against framing. Replace it once the water source is corrected and surrounding materials are dry. Inspect vapor barriers for tears, separated seams, or water trapped underneath, then repair or replace damaged sections. Have soft or deteriorating wood assessed before covering it, since a new liner can conceal damage without correcting it.
How can you prevent future crawl space flooding with drainage, sump pumps, grading, and vapor barriers?
Match each measure to the water’s route. Direct roof runoff away from the foundation, keep drainage paths open, and shape soil so water flows away rather than pooling beside the house. A sump pump can remove collected water, while a vapor barrier limits ground moisture. Neither fixes a leaking pipe or blocked drainage route, so check the crawl space after storms and address recurring wet areas. A practical plan for how to deal with a flooded crawl space also helps reduce the risk of repeat water entry.
What are the health and structural risks of a flooded crawl space, including mold, sewage, and foundation damage?
Persistent dampness can support mold growth and damage insulation and wood framing. Water can cause beams or joists to rot or warp, contributing to uneven floors or foundation movement. Sewage presents a contamination hazard; the U.S. Environmental Protection Agency recommends professional cleanup and repair for buildings affected by contaminated water. Keep people and pets out of affected areas until hazards and damaged materials are properly addressed.
How much does crawl space water removal and drying cost in the United States?
In the United States, professional crawl space water removal, drying, and initial cleanup typically range from $500 to $3,000, depending on the severity of the flooding, the amount of standing water, and whether specialized equipment like industrial dehumidifiers is needed. If extensive repairs, mold remediation, or waterproofing solutions from specialists like Foundation ResQ are required, total costs can rise significantly based on the unique needs of your home.