
Encapsulation is worth it when your crawl space is chronically damp, houses ductwork or mechanical equipment, or keeps growing mold no matter how many times you clean it. If your crawl space is dry, well drained, and vented without issue, you can likely skip it. The real trade-offs are the cost of prep work, the possibility of hidden repairs, and the radon testing you should do both before and after the job.
TL;DR:
- Crawl space encapsulation is most worthwhile if there is ongoing moisture, recurring mold, or ductwork and equipment inside, especially in humid or hot climates.
- Proper systems include a reinforced vapor barrier, sealed vents, insulation, active dehumidification, and drainage fixes to prevent moisture problems from worsening.
- Without addressing drainage issues or structural rot beforehand, encapsulation can trap water and lead to higher repair costs and unseen damage.
- Radon and soil-gas levels should be tested before and after sealing, as encapsulation can alter their movement and potentially require mitigation.
- Cost varies greatly depending on needed repairs, with a detailed inspection crucial to identify active safety issues first and establish realistic scope and timeline.
Table of Contents
- Crawl Space Encapsulation Pros: When Does It Actually Make Sense?
- What a Real Crawl Space Encapsulation System Includes
- The Benefits: What Research Actually Shows
- The Downsides: What Can Go Wrong (and What It Costs You)
- How to Choose: A Decision Checklist Before You Hire Anyone
- How Foundation RESQ Sequences a Crawl Space Job
- Fix the Safety Issues First, Then Encapsulate
- Ready to Find Out What Your Crawl Space Actually Needs?
- Sources
- FAQ
Crawl Space Encapsulation Pros: When Does It Actually Make Sense?
Not every house needs this. The homes that benefit most share a specific set of symptoms, and if yours matches two or three of them, encapsulation usually pays for itself within a few years through comfort, air quality, and reduced repair bills.
Chronic dampness and recurring mold top the list. If you’ve had a mold remediation crew out more than once, or you can smell must the moment you crack open the crawl space access door, sealing and conditioning the space addresses the root cause instead of the symptom. A study at Oak Ridge National Laboratory found sealed, insulated crawl spaces showed no meaningful mold growth potential over a year of monitoring, compared to vented designs in the same climate.
Ductwork or mechanical equipment located in the crawl space is another strong signal. Air handlers, supply ducts, and water heaters sitting in a humid, vented crawl space lose efficiency and develop corrosion faster than the same equipment in a conditioned space. Sealing the space around that equipment also cuts down on the musty smell that travels up through leaky duct seams into your living area.
Musty indoor air, even when you can’t pinpoint the source, often traces back to crawl space humidity migrating upward through floor penetrations and duct leaks. Pest pressure (termites, wood-boring insects, rodents drawn to damp wood) tends to drop once the moisture source that attracts them is gone.
Climate matters more than most homeowners expect. In mixed and hot-humid regions, outdoor ventilation frequently pulls in more moisture than it removes. This is exactly why building scientists have shifted away from the old “vent it and forget it” model in favor of sealed, conditioned crawl spaces. If you live somewhere with long, humid summers and your crawl space vents are doing more harm than good, that’s a strong point in favor of closing them off.
A few conditions make encapsulation worth pursuing:
- Standing water or visible mold on joists and subfloor
- HVAC ductwork or a water heater located under the house
- Musty odors noticeable from the living space above
- Recurring pest activity tied to damp wood
- A history of buckling hardwood floors or swollen baseboards
Pro Tip: Before you call a contractor, crawl in (or send a camera on a pole) and check the ground for standing water after a rain. If water pools and doesn’t drain within a day or two, you have a drainage problem that needs solving before any liner goes down.
That last point deserves emphasis. If your crawl space has active water intrusion, a failing perimeter drain, or a structural defect like a sagging beam or rotted joist, fix those first. Encapsulating over a drainage problem just traps the water under a liner where you can’t see it, which is one of the fastest ways to turn a $4,000 job into a $12,000 one.
What a Real Crawl Space Encapsulation System Includes
A proper system is not a roll of plastic stapled to the joists. It’s a coordinated set of components that work together to keep moisture, soil gas, and outside air out while giving whatever moisture remains a way to leave.
- A ground vapor barrier rated 10 to 20 mil, with seams taped and the liner run up the foundation walls and mechanically fastened or sealed at the termination line. A thin 6 mil painter’s liner tears within a season; contractors doing this correctly spec heavier reinforced material.
- Sealed foundation vents, since venting works against you once the space is treated as conditioned rather than outdoor air.
- Insulation at the walls or rim joists, following ENERGY STAR’s guidance on continuous ground covers, taped seams, and perimeter insulation for conditioned crawl spaces.
- A dedicated dehumidifier or a supply of conditioned air tied into the home’s HVAC system to actively manage humidity rather than hoping the sealed space stays dry on its own.
- Drainage prep, meaning any grading, gutter, or interior drain issues get resolved before the liner goes in, not after.
A liner alone, without addressing drainage or structural rot first, is the most common corner-cutting move in this trade. Model building codes now recognize conditioned crawl space construction as an acceptable approach, but only when it includes continuous ground cover, perimeter insulation, and active conditioning or mechanical ventilation together. Skip any one of those and you’re left with a partial fix that traps problems instead of solving them.
Two code details catch people off guard. Many jurisdictions require a visible termite inspection gap between the top of the liner and the sill plate so a pest inspector can still see evidence of activity. And if the crew uses spray foam insulation, some jurisdictions require an ignition or thermal barrier over it. A reputable crawl space encapsulation system accounts for both from the start rather than requiring a callback later.
The Benefits: What Research Actually Shows
The case for encapsulation isn’t just comfort talk. It’s backed by field data from monitored houses, not marketing copy, and the numbers are specific enough to weigh against a bid.
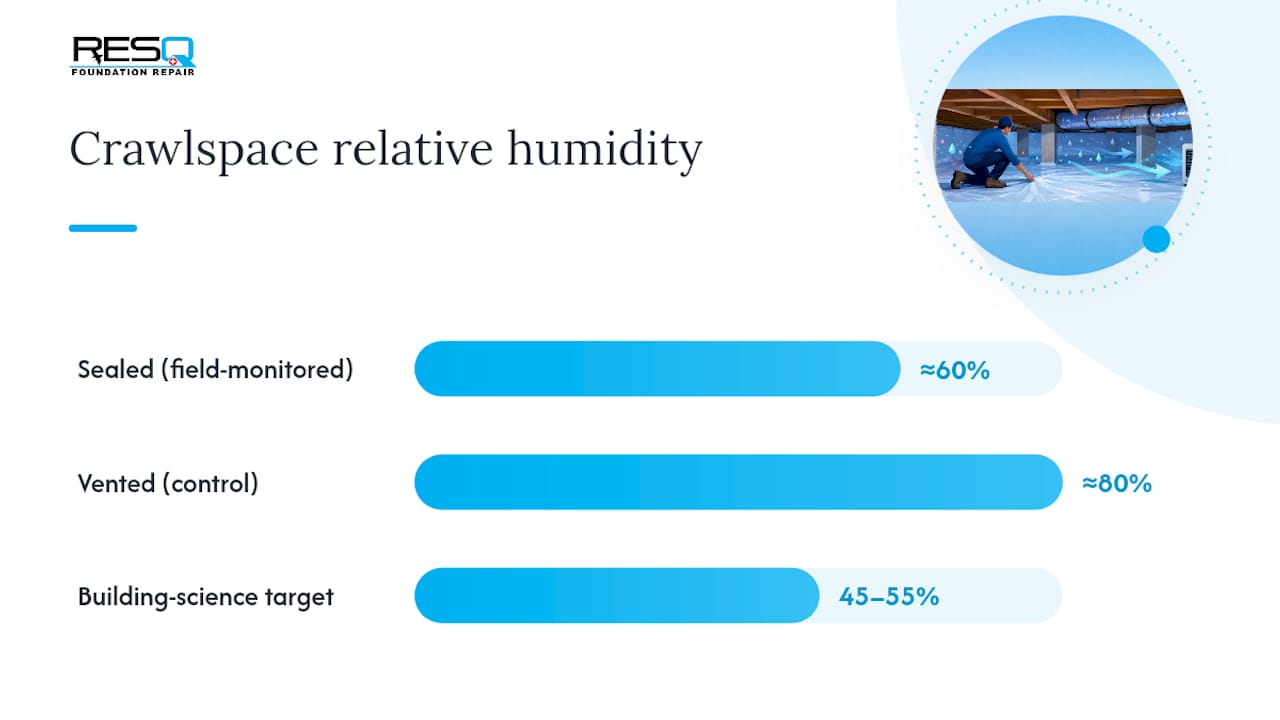
Moisture control is the headline benefit. ORNL’s 12-month monitoring study tracked temperature, humidity, and wood moisture content in paired sealed and vented crawl spaces and found the sealed design consistently outperformed the vented one for moisture control. Field monitoring in hot-humid locations like Baton Rouge found closed crawl spaces holding around 60% relative humidity during warm months, compared to roughly 80% in vented control spaces. The practical target most building scientists recommend is 45 to 55% relative humidity, which is low enough to stop mold growth without over-drying wood framing.
Energy savings are real, though they vary. Building America field research found properly sealed and conditioned crawl spaces typically cut heating and cooling energy use by 15% to 18%. That range matters: a homeowner in a mild climate with ducts already outside the crawl space will see less benefit than someone in a hot, humid region with ducts running the length of the crawl space floor.
Building America’s research puts typical savings at a moderate range, with some site-specific studies showing considerably higher cooling-season numbers when insulation is placed correctly.
Comfort and durability improvements show up fast. Floors feel warmer underfoot in winter because you’ve removed the cold, damp air sitting directly under the subfloor. Musty odor complaints drop within weeks of a properly sealed and dehumidified space. Long-term, wood decay and pest pressure decline because the moisture that attracts termites and supports fungal growth is no longer available in the quantities it used to be.
HVAC performance benefits deserve more attention than they usually get. When ducts and equipment sit inside a conditioned, sealed crawl space instead of a humid vented one, you typically see fewer HVAC service calls tied to corrosion, condensation on ductwork, or coil issues caused by excess moisture. That’s a maintenance cost most homeowners don’t factor into the payback calculation, but contractors who service crawl space HVAC systems see it constantly.
A few practical benefits worth calling out directly:
- Lower and more stable indoor humidity, especially in homes where the crawl space sits below finished living space
- Reduced mold recurrence, which lowers long-term mold remediation costs
- Better performing HVAC equipment when ducts run through the crawl space
- Warmer floors and less noticeable seasonal odor in the rooms above
None of this means encapsulation is a universal fix. It’s a targeted solution for a specific moisture and air quality problem, and the size of the benefit depends heavily on your climate, your duct layout, and how well the job is executed.
The Downsides: What Can Go Wrong (and What It Costs You)
Encapsulation done poorly can leave you worse off than doing nothing, and the ways it fails are predictable enough that you should know them before signing a contract.
Hidden prep costs are the number one budget surprise. A homeowner asks for a liner and dehumidifier, gets a quote, and then discovers mid-project that the drainage needs regrading, there’s mold that requires remediation before anyone can work safely in the space, or a support beam is rotted and needs structural repair. Each of those is a separate line item that a basic encapsulation quote won’t include. Understanding what drives crawl space costs before you get quotes helps you ask the right questions upfront instead of getting surprised at week two.
Trapped moisture from bad prep or wrong insulation placement is the most common technical failure. If the liner goes down over a drainage problem, or seams aren’t properly taped, moisture gets sealed in rather than kept out. Insulation placement also has to match the climate: floor-insulated closed crawl spaces tend to perform better in cold climates for heating, while wall-insulated designs work better in hot-humid regions, particularly when ducts sit inside the sealed space. A contractor who applies a one-size-fits-all insulation approach regardless of climate is cutting a corner that shows up later as condensation or higher energy bills.
Radon and soil-gas behavior can change once you seal a crawl space, and this is the risk most homeowners have never heard of. The EPA sets a radon action level of 4 pCi/L and recommends considering mitigation between 2 and 4 pCi/L. Sealing changes how soil gas moves through the space, which means a crawl space that tested fine before encapsulation should be retested afterward, not assumed to still be safe. If levels come back elevated, mitigation (typically a vent pipe and fan system) needs to be part of the plan, not an afterthought.
Combustion appliance safety is a separate concern that gets overlooked. If you have a gas water heater or furnace in or near the crawl space, sealing the space changes airflow and can affect draft and venting for that appliance. This isn’t something a homeowner should evaluate on their own. Any contractor sealing a crawl space with combustion equipment nearby needs to verify the appliance still vents correctly once the space is closed.
Ongoing maintenance is real, not optional. A dehumidifier running continuously adds a modest amount to your electric bill and needs periodic filter cleaning. The condensate pump that drains it can fail, and when it does, water backs up into the sealed space with nowhere to go. Liners can also be punctured by pest control technicians, plumbers, or anyone else who crawls through the space for unrelated work, so it’s worth telling every future contractor the space is encapsulated before they go in with tools.
A short list of what to watch for during and after the job:
- Ask specifically whether drainage and structural issues will be diagnosed before the liner goes in, not discovered after
- Confirm insulation placement matches your climate zone, not a generic template
- Require radon testing before the job and again after completion
- Ask how the contractor evaluates combustion appliance venting in sealed spaces
- Get a clear answer on who services the dehumidifier and condensate pump going forward
Pro Tip: If your crawl space has a gas water heater and you’re getting quotes for encapsulation, ask each contractor directly how they plan to verify the appliance still drafts safely once the space is sealed. If they don’t have a clear answer, that’s a red flag worth acting on before you sign anything.
How to Choose: A Decision Checklist Before You Hire Anyone
Start with an honest inspection, not a sales pitch. Walk through what actually needs to be checked before anyone talks about pricing.
Inspection checklist:
- Evidence of standing water or past water lines on foundation walls and framing
- Existing drainage: gutters, grading, and whether a perimeter drain or sump system is present and functioning
- Visible mold, and whether it’s isolated or widespread enough to require professional remediation first
- Location of ductwork, water heaters, or other mechanical equipment inside the crawl space
- Radon history for the property, or a baseline test if none exists
If any of the first three items turn up a problem, that needs to be resolved before encapsulation, not bundled into the same afterthought. Chasing a mold remediation job in tandem with a drainage repair and an encapsulation install in one rushed contract is how corners get cut.
When comparing bids, put these questions in front of every contractor:
- What is the liner thickness (mil rating), and is it taped at seams and terminated up the foundation wall?
- How is the dehumidifier sized for this specific square footage, and does it include a built-in condensate pump?
- Who handles drainage repairs, mold remediation, or structural fixes if the inspection finds them, and is that priced separately or included?
- What’s the warranty on the liner, the sealing work, and the dehumidifier, and does it cover labor or just parts?
- Is radon testing included before and after the job, and who performs mitigation if levels come back elevated?
- What’s the realistic timeline, and who’s responsible for permits and any required inspections?
A simple heuristic cuts through most of the noise: fix active safety issues first (standing water, structural rot, combustion venting concerns), then encapsulate when you have chronic moisture, ducts or mechanical equipment in the space, or recurring mold that keeps coming back after cleaning. If none of those apply, your money is often better spent on gutters, grading, or a stand-alone dehumidifier instead of a full system.
How Foundation RESQ Sequences a Crawl Space Job
The order of operations matters as much as the materials. A professional crew doesn’t start with the liner. It starts with a free inspection to figure out what’s actually happening under the house before recommending anything.
A professional crawl space job follows a standard sequence: inspect first, then remediate any drainage or structural issues that show up, then install the liner and insulation, then bring in dehumidification, and finally verify results with humidity readings and, where relevant, radon testing. Skipping ahead to the liner before drainage or mold problems are resolved is exactly how a homeowner ends up with trapped moisture under a brand-new vapor barrier.
That sequencing shows up in how the company scopes work:
- Free inspections to assess drainage, structural condition, mold presence, and equipment location before any quote is written
- Crawl space waterproofing work to handle drainage problems that need to be fixed before a liner goes down
- Dehumidification sized to the square footage, not a generic unit dropped in and left
- Financing options for homeowners who need to spread out the cost of drainage repairs, mold remediation, and encapsulation together
What you should expect as a homeowner: a written scope that separates prep work from encapsulation costs, a realistic timeline that accounts for any remediation needed first, and warranty terms that are explained before you sign, not buried in fine print afterward.
Fix the Safety Issues First, Then Encapsulate
If I had to give one piece of advice to a homeowner staring at a crawl space quote, it’s this: sequence matters more than the product. Active water intrusion, a rotted support beam, or a gas appliance with a venting question should get resolved before a single square foot of liner goes down. Encapsulating over an unresolved problem doesn’t fix it. It just hides it somewhere you can’t see anymore.
If you’re not ready to commit to a full system yet, interim measures buy you time without locking in the wrong solution. Clean the gutters, fix the grading so water moves away from the foundation, and run a temporary dehumidifier through the humid months while you plan. None of that is a substitute for a properly sealed and conditioned space, but it slows the damage while you get quotes and figure out what encapsulation actually means for your specific house.
Timing matters too. Spring and early fall tend to be the least backed-up seasons for contractor scheduling, since summer heat and humidity drive a rush of emergency calls. Booking an inspection before the busy season gives you more room to plan the job right instead of rushing it.
— Kayle
Ready to Find Out What Your Crawl Space Actually Needs?
It is important to get a clear inspection to understand what’s happening under your house in plain terms before spending any money.

If your crawl space checks the boxes for chronic dampness, ductwork sitting in humid air, or mold that keeps coming back, the next step is simple: schedule a free inspection and ask for the written report along with a testing plan that includes radon readings before and after any work. Foundation RESQ also offers financing options for homeowners who need to combine drainage repairs, mold remediation, and a full encapsulation system into one project rather than three separate bills. Whole-home efficiency upgrades matter too. Homeowners tackling an older house sometimes pair crawl space work with other envelope improvements, including interior door upgrades that improve energy efficiency in older construction. Ask for the inspection first. Everything else follows from what it finds.
Sources
The research behind this guide comes from monitored field studies, not marketing claims. The Building America Top Innovations profile on unvented, conditioned crawlspaces documents the 15% to 18% energy savings range. ENERGY STAR’s guide to closing and conditioning ventilated crawlspaces lays out the technical specifications. ORNL’s Pub33059 study supplies the moisture-performance data, and ACEEE’s field research covers humidity, energy, and radon behavior together.
- Building America Top Innovations Hall of Fame Profile – Unvented, Conditioned Crawlspaces
- Guide to Closing and Conditioning Ventilated Crawlspaces (ENERGY STAR / Building America guidance)
- Comparative Study of Vented vs. Unvented Crawlspaces (ORNL Pub33059)
- Closed crawl spaces: impacts on humidity, energy and radon (ACEEE / field studies)
FAQ
Is It Worth Encapsulating a Crawl Space?
It’s worth it when your crawl space is chronically damp, houses ductwork or equipment, or has recurring mold, since those conditions typically drive real energy and moisture-control gains. If your space is dry and well drained, prioritize other repairs first.
How Much Does It Cost to Encapsulate a 2,000 Sq Ft Crawl Space?
Pricing depends heavily on whether drainage repairs, mold remediation, or structural fixes are needed before the liner and dehumidifier go in, so a bare quote rarely reflects the final cost. Foundation RESQ doesn’t publish flat pricing online; a free inspection is the fastest way to get an accurate number for your specific crawl space.
What Are the Downsides of Crawl Space Encapsulation?
The main risks are trapped moisture from poor prep or wrong insulation placement, changes in radon and soil-gas behavior that require retesting, and combustion appliance venting issues that need professional evaluation. Hidden prep costs for drainage or mold remediation also commonly inflate the upfront price beyond the initial quote.
Should Every Crawl Space Be Encapsulated?
No. Homes with dry, well-ventilated crawl spaces and no ductwork or equipment down there often see limited benefit relative to the cost. Encapsulation makes the most sense for chronic moisture, recurring mold, or crawl spaces that hold HVAC ductwork, particularly in mixed or hot-humid climates.
Does Encapsulation Increase Radon Levels?
Sealing a crawl space can change how soil gas moves through the space, which is why testing before and after the job matters. The EPA’s action level is 4 pCi/L, and levels between 2 and 4 pCi/L are worth considering for mitigation as part of the encapsulation plan.