
The ideal crawl space humidity is 45 to 55% relative humidity for most sealed and conditioned crawl spaces, based on EPA guidance recommending 30 to 50% indoors where achievable. A short spike after a rainstorm isn’t a crisis, but sustained readings above 60% mean a moisture-control failure that needs a source fix, not just a fan. Check wood moisture content too. Framing above 17 to 20% signals real structural risk, regardless of what the air reading says.
TL;DR:
- Maintaining crawl space humidity below 60% is crucial, but high readings often result from source issues like leaks or unsealed vapor barriers.
- The preferred crawl space humidity range is 45 to 55%, with lower levels recommended in cold climates or for allergy and pest concerns.
- Proper measurement requires sensors in multiple spots over 48 to 72 hours, paired with wood moisture content checks to assess structural risk.
- Fixing bulk water entry and sealing the space takes priority over installing dehumidifiers, which are only effective after source problems are addressed.
- Professional inspections should identify water pathways, repair leaks, install vapor barriers, and condition the space before adding mechanical drying.
Table of Contents
- What Is the Recommended Crawl Space Humidity Level?
- What Humidity Level Signals a Real Problem?
- How Do You Measure Crawl Space Humidity Correctly?
- Why Is My Crawl Space Humidity So High?
- Should You Vent or Seal Your Crawl Space?
- What Should You Fix First in a Damp Crawl Space?
- When Should You Call a Professional?
- How Foundation Resq Approaches Crawl Space Moisture Control
- Editorial Take: Stop Chasing the Number, Start Chasing the Source
- Get a Free Crawl Space Inspection
- Sources
- FAQ
What Is the Recommended Crawl Space Humidity Level?
Two numbers get thrown around in crawl space guidance, and both are correct for different contexts. The EPA’s 30 to 50% range is the general indoor moisture standard, built for living spaces where comfort and mold prevention both matter. Crawl spaces are dirtier, colder, and closer to the ground, so most contractors and inspectors treat 45 to 55% as the realistic operating band for a properly sealed crawl space.
Here’s the distinction that trips people up:
- 30 to 50% RH is the EPA’s broad indoor target, useful as an upper reference point for any enclosed space in the home.
- 45 to 55% RH is the practical crawl space humidity level most inspectors use, since crawl spaces sit closer to soil moisture and rarely get the airflow a living room does.
- A single high reading after a storm is a spike. It only becomes a problem if it doesn’t recover within a day or two.
- Dew point matters more than the RH number alone, since relative humidity shifts with temperature. A crawl space reading 55% RH at 65°F holds less actual moisture than one reading 55% at 80°F.
Cold climates and homes with allergy or pest concerns should aim for the lower end, closer to 45%.
What Humidity Level Signals a Real Problem?
The numbers matter because each threshold maps to a specific risk, not just a vague “too damp” feeling.
Statistic to know: The EPA identifies a relative humidity level above which mold and pest activity can increase sharply, even in spaces that look visually dry.
The Forest Products Laboratory identifies a moisture content threshold for framing lumber, above which decay risk increases, with a lower range considered safer for equilibrium moisture content in framing.
Visible signs tend to lag the numbers. White or gray mineral staining on masonry (efflorescence) points to bulk water, not just humid air.
How Do You Measure Crawl Space Humidity Correctly?
A single reading from a cheap hygrometer near the access hatch tells you almost nothing useful. Crawl spaces have microclimates, and the spot nearest the door is often the driest part of the whole space.
Three tools cover what you actually need:
- A digital hygrometer ($10 to $50) for spot checks and rough trending.
- A datalogger that records RH and temperature over time, so you can see daily cycles instead of one snapshot.
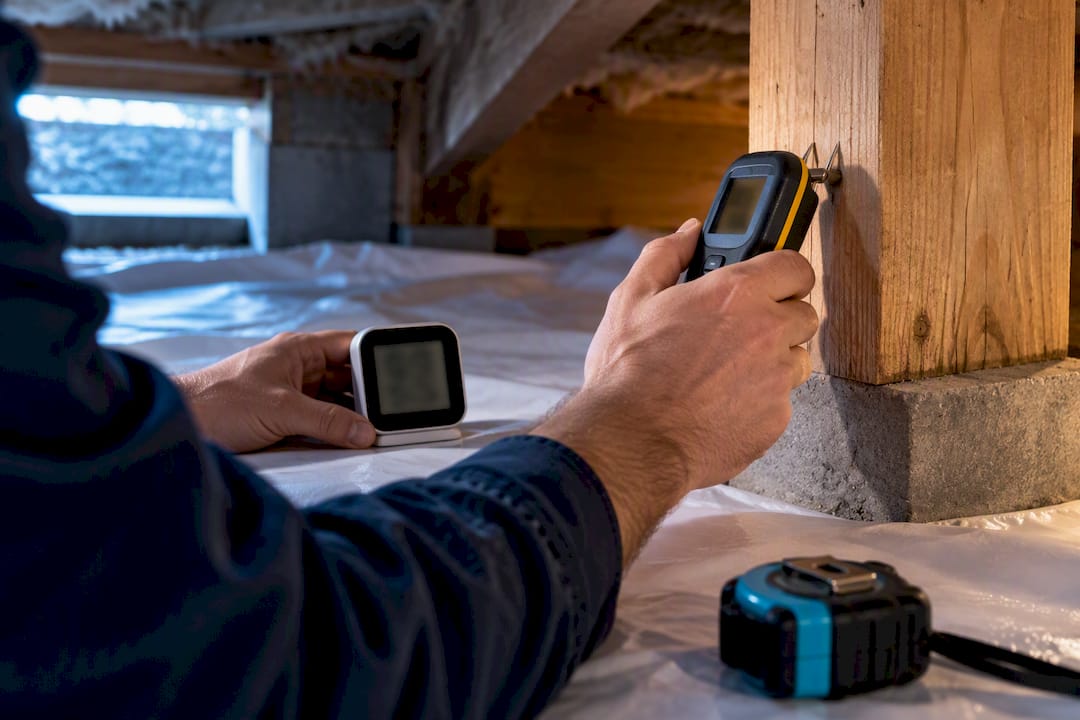
- A wood moisture meter, which reads the actual moisture content of joists and subfloor rather than just the surrounding air.
Place sensors in at least three spots: near any suspected problem area (a damp corner, a plumbing run), on a joist near the center of the space, and close to the ground vapor barrier if one exists. Log readings for 48 to 72 hours minimum to catch the daily rise and fall, since crawl space humidity often climbs overnight as temperatures drop and dew point rises relative to the surface.
Pro Tip: Air RH can look fine while the framing above it stays wet, especially near cold surfaces and vapor barrier seams. Always pair an air reading with a wood-moisture check before deciding the space is dry.
Why Is My Crawl Space Humidity So High?
Most high-humidity crawl spaces trace back to one of a handful of repeat offenders, and finding the actual pathway matters more than any piece of equipment you could buy.
- Bare or damp dirt floor — exposed soil releases moisture into the air constantly, even without a leak.
- Failed or missing vapor barrier — gaps, tears, or unsealed seams let ground moisture straight through.
- Plumbing leaks — a slow drip under the house can run for months before anyone notices.
- Groundwater intrusion — a high water table or poor site grading pushes water toward the foundation.
- Gutters and downspouts dumping at the foundation — roof runoff with nowhere to go saturates the soil right next to the crawl space walls.
- Warm, humid outdoor air infiltrating through vents — in humid climates, opening vents can actually raise indoor humidity rather than lower it, since incoming air carries its own moisture load.
That last point catches a lot of homeowners off guard: venting isn’t automatically the fix; sometimes it’s the cause.
Should You Vent or Seal Your Crawl Space?
Standard vented crawl spaces made sense decades ago, when building codes assumed airflow would dry things out. In practice, venting works against you in warm, humid climates. When outdoor dew point exceeds the temperature of crawl space surfaces, incoming air condenses on cold framing instead of drying it, which is exactly backward from the intended effect.
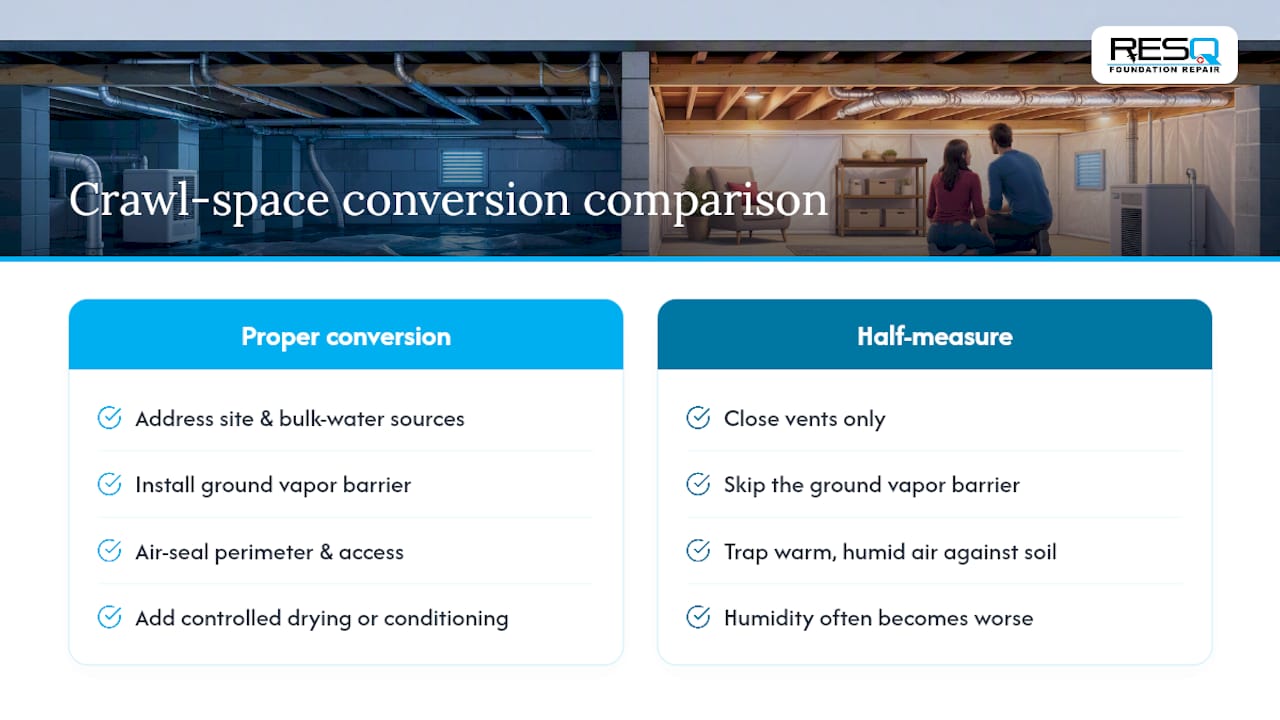
ENERGY STAR and Building America research both point toward closed, conditioned crawl spaces as the more reliable long-term setup, but only when the conversion is done as a full sequence rather than a single step. Sealing the vents without also installing a ground vapor barrier, air sealing the perimeter, and adding some form of mechanical drying often makes humidity worse, not better, because you’ve trapped the moisture source inside without giving it anywhere to go.
Field monitoring backs this up: properly sealed crawl spaces with ground covers and controlled drying show more stable humidity over time than vented spaces exposed to swinging outdoor conditions. The keyword there is “properly.” Half-measures, like closing vents but skipping the vapor barrier, tend to trap warm, humid air against damp soil, which is worse than leaving the vents open.
It’s converting to a closed and conditioned system with the vapor barrier and drying components installed in the right order, or at minimum reassessing whether your existing vents and access doors are helping or hurting given your specific climate and site drainage.
What Should You Fix First in a Damp Crawl Space?
Chasing a humidity number with a dehumidifier before fixing the water source is the single most common mistake homeowners make, and it wastes money on equipment that’s fighting a losing battle. The EPA’s own remediation guidance is blunt about the order: control bulk water and vapor entry first, then dry.
Here’s the sequence that actually works, in priority order:
- Stop bulk water. Fix grading so it slopes away from the foundation, extend downspouts, and repair any plumbing leaks you find during inspection.
- Install a continuous ground vapor barrier. Use 6 mil polyethylene or heavier, tape every seam, and run it up the perimeter walls rather than stopping at the ground.
- Air seal the access door and band joist. Gaps here let humid outdoor air bypass whatever drying system you install next.
- Add mechanical drying last. Depending on your setup, that means either tying the crawl space into your home’s conditioned supply air or installing a dedicated crawl space dehumidifier sized for the square footage.
Pro Tip: Dry any wet material within 24 to 48 hours of discovering it. Waiting longer gives mold spores the window they need to establish, even if you fix the underlying leak the same week.
| Step | Priority | Typical Fix |
|---|---|---|
| Bulk water control | 1st | Grading, gutters, downspout extensions |
| Vapor barrier | 2nd | 6 mil+ poly, taped seams, wall extension |
| Air sealing | 3rd | Seal access door, band joist, gaps |
| Mechanical drying | 4th | Conditioned supply air or dedicated dehumidifier |
Skipping straight to step four is why some homeowners run a dehumidifier for a full season and still see musty smells and standing puddles after the next hard rain. The unit was never the problem; the water pathway was.
When Should You Call a Professional?
DIY monitoring and basic fixes handle a lot of ground, but certain signs mean it’s time to bring in someone with proper equipment and diagnostic experience.
- Sustained RH readings above 60% that don’t recover after a few dry days.
- Visible wood rot, soft or spongy joists, or sagging subfloor.
- Mold covering more than a small, isolated patch.
- Standing water that returns after every rain, not just during storms.
- Any plumbing leak you can’t fully trace or stop yourself.
- Combustion appliances (water heaters, furnaces) located inside the crawl space, where trapped moisture raises safety concerns.
A legitimate inspection should include moisture mapping across the whole space, wood moisture testing at multiple points, an assessment of drainage and sump function, and a specific vapor barrier and encapsulation plan tailored to your foundation type. Ask any contractor what monitoring they provide after the work is done, whether they install water alarms, and what’s covered under warranty. A written scope listing exact materials, not just a verbal promise, is what separates a real remediation plan from a guess.
How Foundation Resq Approaches Crawl Space Moisture Control
A professional crawl space remediation service typically starts every job with a free inspection to identify the actual moisture pathway before recommending equipment. Such an inspection generally covers drainage assessment, vapor barrier condition, and existing dehumidification, following the priority order building science recommends:
- Locate and correct bulk water sources first (grading, drainage, plumbing).
- Install or repair the vapor barrier and encapsulation system.
- Air seal the enclosure before adding mechanical drying.
Whichever contractor you use, ask for a written follow-up schedule and monitoring plan. A one-time fix without a way to verify humidity stays in range over the following year isn’t a complete solution.
Editorial Take: Stop Chasing the Number, Start Chasing the Source
The obsession with hitting a precise humidity percentage misses the point. Air humidity is a symptom you can measure easily. Wood moisture is the actual structural risk, and it’s the number inspectors should lead with.
Conventional advice tends to hand homeowners a dehumidifier as step one. That’s backward. If bulk water is still entering through bad grading or a cracked vapor barrier, you’re running a machine against an unlimited moisture supply, and the electric bill climbs while the underlying problem sits untouched.
Prioritize finding the water pathway before buying anything. A $15 hygrometer paired with a wood moisture meter will tell you more in 72 hours of logging than a single expensive reading ever could. Fix the source, seal the enclosure, then dry. In that order, every time.
— Kayle
Get a Free Crawl Space Inspection
Certain companies handle crawl space remediation and encapsulation, dehumidification, sump pump repair, and mold remediation for homeowners dealing with moisture problems. Rather than guessing at equipment or running a dehumidifier against an active leak, a free inspection identifies the actual water pathway first, whether that’s a failed vapor barrier, poor site drainage, or groundwater intrusion.

If your crawl space humidity has been sitting above 55 to 60% and you’re not sure whether the fix is drainage, encapsulation, or mechanical dehumidification, a professional inspection will map the space and give you a written scope before any work starts. Request your free inspection to get an accurate diagnosis instead of a guess.
Sources
- A Brief Guide to Mold, Moisture, and Your Home (EPA)
- ENERGY STAR guidance on crawlspaces
- USFS Forest Products Laboratory research on moisture and wood durability
- Sealed crawl spaces with integrated whole-house ventilation (Building America)
FAQ
Is 50% Humidity Too High for a Basement?
No, 50% RH sits right at the upper edge of the EPA’s recommended indoor range of 30 to 50%.
What Should Attic Humidity Be in Summer?
Attics run hotter than crawl spaces, though, so ventilation and insulation play a bigger role in keeping RH from spiking during peak summer heat.
Should You Run a Dehumidifier in a Crawl Space?
A dehumidifier helps once bulk water sources like leaks, poor grading, and vapor barrier gaps are already fixed. Running one before addressing those sources means fighting a continuous moisture supply, which wastes energy and rarely brings humidity down for good. Foundation RESQ typically installs dehumidification as the final step after source repairs are complete.
Why Is My Crawl Space Humidity So High?
The most common causes are bare dirt floors, a failed or missing vapor barrier, plumbing leaks, groundwater intrusion, and gutters dumping water at the foundation. In humid climates, open vents can also pull in outdoor moisture, which raises indoor humidity rather than lowering it.
What Is the Ideal Crawl Space Humidity Level?
Most inspectors target 45 to 55% relative humidity for a sealed crawl space, based on the EPA’s broader 30 to 50% indoor guidance.